
You are here: Start » Programming Tips » Optimizing Image Analysis for Speed
Optimizing Image Analysis for Speed
General Rules
Rule #1: Avoid Unnecessary Computations.
- Appropriate Image Resolution. Choose an image resolution that suits your needs. Higher resolutions slow down processing.
- Use the inRoi input. Limit processing to only those pixels required in subsequent steps.
- Optimize Sequential Operations. If multiple image processing operations occur within a specific area, consider using CropImage initially.
- Image Type Efficiency. Stick to UInt8 (8-bit) images unless necessary; avoid overusing other types.
- Single-Channel Images. Opt for single-channel images when color information is not being processed.
- Pre-compute Tasks. Shift computations that only need to be performed once out of the main program loop or into a separate program. Below is an example structure of the ' 'Main ' macrofilter, illustrating this approach with two macrofilters: the first handles one-time computations, and the second manages the main program loop as a Task.
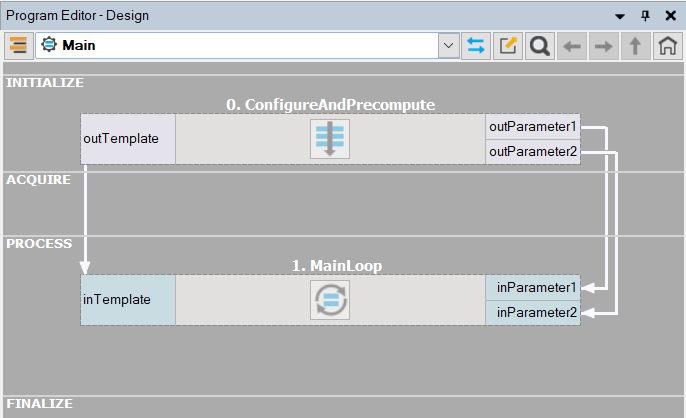
Typical program structure separating precomputing from the main loop.
Rule #2: Prefer simple solutions.
- Do not use Template Matching if simpler techniques such as Blob Analysis or 1D Edge Detection would suffice.
- Prefer pixel-precise image analysis techniques (Region Analysis) and the Nearest Neighbour (instead of Bilinear) image interpolation.
- Consider extracting higher level information early in the program pipeline – for example, it is much faster to process Regions than Images.
Rule #3: Mind the influence of the user interface.
- Note that in the development environment, displaying data on the preview windows takes a lot of time. Choose Program » Previews Update Mode » Disable Visualization to get performance closer to what you can expect in the runtime environment.
- In the runtime environment, use the VideoBox control for image display. It is highly optimized and can display hundreds of images per second.
- Using the VideoBox controls, prefer the setting of SizeMode: Normal, especially if the image to be displayed is large. Also, consider using DownsampleImage or ResizeImage.
- Reduce the number of data exchange points with the HMI. For more complex user interfaces, implement a separate Worker Task to handle data refreshing.
- Prefer the Update Data Previews Once an Iteration option.
- Be mindful of Diagnostic Mode. Turn it off whenever you need to test speed.
- Pay attention to the information provided by the Statistics window. Before optimizing the program, make sure that you know what really needs optimizing.
Rule #4: Mind the influence of the data flow model.
Data flow programming allows for creating high speed machine vision applications nearly as well as the standard C++ programming. This, however, requires meeting an assumption that we are using high-level tools, and image analysis is the main part. On the other hand, for low level programming tasks – like using many simple filters to process high numbers of pixels, points, or small blobs – all interpreted languages will perform significantly slower than C++.
- For performance-critical low-level programming tasks, consider User Filters.
- Prefer formula blocks over arithmetic filters like AddIntegers or DivideReals.
- Use a lower number of higher level filters (e.g. RotatePath) instead of a big number of low level filters or formulas (e.g. calculating coordinates of all individual points of the path).
- Avoid using low-level filters (such as MergeDefault or ChooseByPredicate) with non-primitive types such as Image or Region. Filters perform full copying of at least one of the input objects. Prefer using Variant Step Macrofilters instead.
- Be aware of the connections with conversions (the arrow head with a dot) – there are additional computations, which in some cases (e.g. RegionToImage) might take some time. If the same conversion is used many times, then it might be better to use the converting filter directly.
- The sequence of filters with array connections may produce a lot of data on the outputs. If only the final result is
important, then consider extracting a macrofilter that will be executed in array mode as a whole, and inside of it, all
the connections will be basic. For example:
Before optimizing: There are several arrays of intermediate results.
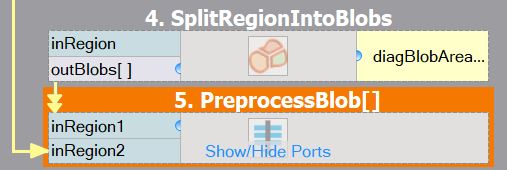
After optimizing: Only the final array is computed, reducing memory consumption. Please note that the macrofilter input is of Region, not RegionArray type.
Common Optimization Tips
Apart from the above general rules, there are also some common optimization tips related to specific filters and techniques. Here is a checklist:
- Template Matching: Do not mark the entire object as the template region, but only mark a small part that has a unique shape.
- Template Matching: Prefer high pyramid levels, i.e., leave the inMaxPyramidLevel set to Auto, or to a high value such as between 4 and 6.
- Template Matching: Prefer setting inEdgePolarityMode to not Ignore and inEdgeNoiseLevel to Low.
- Template Matching: Use as high a value of the inMinScore input as possible.
- Template Matching: If you are processing high-resolution images, consider setting the inMinPyramidLevel to 1 or even 2.
- Template Matching: When creating template matching models, try to limit the range of angles using the inMinAngle and inMaxAngle inputs.
- Template Matching: Do not expect high speed when allowing rotations and scaling at the same time. Additionally, model creation can take a significant amount of time or even fail with an "out of memory" error.
- Template Matching: Consider limiting inSearchRegion. It might be set manually, but sometimes it also helps to use Region Analysis techniques before Template Matching.
- Template Matching: Decrease inEdgeCompleteness to achieve higher speed at the expense of lower reliability. This might be useful when the pyramid cannot be made higher due to information loss.
- Do not use these filters in the main program loop: CreateEdgeModel1, CreateGrayModel, TrainOcr_MLP, and TrainOcr_SVM.
- If you always transform images in the same way, consider filters from the Image Spatial Transforms Maps category instead of those from Image Spatial Transforms.
- Do not use image local transforms with arbitrarily shaped kernels: DilateImage_AnyKernel, ErodeImage_AnyKernel, and SmoothImage_Mean_AnyKernel. Consider the alternatives without the "_AnyKernel" suffix.
- SmoothImage_Median can be particularly slow. Use Gaussian or Mean smoothing instead, if possible.
Application Warm-Up (Advanced)
An important practical issue in industrial applications with triggered cameras is that the first iteration of a program often needs to be executed at full speed. However, there are additional computations performed in the first iterations that must be taken into account:
- Memory buffers (especially images) for output data are allocated.
- Memory buffers get loaded into the cache memory.
- External DLL libraries get delay-loaded by the operating system.
- Modern CPU mechanisms, like branch prediction, get trained.
- Connections with external devices (e.g. cameras) get established.
- Some filters, especially those from 1D Edge Detection and Shape Fitting, precompute some data.
These issues arise from both the simplified data-flow programming model, as well as from the modern architectures of computers and operating systems. Some, but not all, of them can be solved with the use of the Aurora Vision Library (see: When to use Aurora Vision Library?). There is however, an idiom that might be useful also with Aurora Vision Studio – it is called "Application Warm-Up" and consists in performing one or a couple of iterations on test images (recorded) before the application switches to the operational stage. This can be achieved with the following "GrabImage" variant macrofilter:
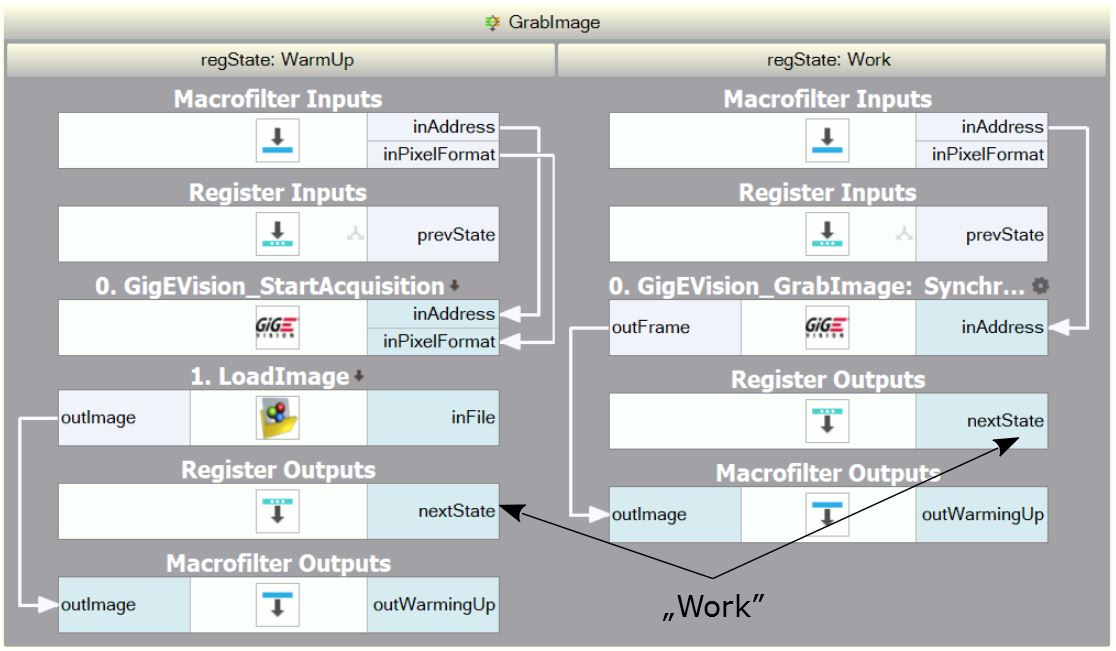
An example "GrabImage" macrofilter designed for application warming-up.
The "GrabImage" variant macrofilter shown above is an example of how application warm-up can be achieved. It starts its operation in the "WarmUp" variant, where it initializes the camera and produces a test image loaded from a file (which has exactly the same resolution and format as the images acquired from the camera). Then it switches to the "Work" variant, where the standard image acquisition filter is used. There is also an additional outIsWarmingUp output that can be used, for example, to suppress the output signals during the warm-up stage.
Configuring Parallel Computing
The filters of Aurora Vision Studio internally use multiple threads to utilize the full power of multi-core processors. By default, they use as many threads as there are physical processors. This is the best setting for the majority of applications, but in some cases, a different number of threads might result in faster execution. If you need maximum performance, it is advisable to experiment with the ControlParallelComputing filter with both higher and lower number of threads. In particular:
- If the number of threads is higher than the number of physical processors, then it is possible to utilize the Hyper-Threading technology.
- If the number of threads is lower than the number of physical processors (e.g., 3 threads on a quad-core machine), then the system has at least one core available for background threads (like image acquisition, GUI, or computations performed by other processes), which may improve its responsiveness.
Configuring Image Memory Pools
Memory allocation is among the significant factors affecting filter performance. Most of the filters available in Aurora Vision Studio re-use their memory buffers between consecutive iterations, which is highly beneficial for their performance. Some filters, however, still allocate temporary image buffers, because doing otherwise would make them less convenient in use. To overcome this limitation, there is the filter ControlImageMemoryPools which can turn on a custom memory allocator for temporary images.
There is also a way to pre-allocate image memory before the first iteration of the program starts. For this purpose, use the InspectImageMemoryPools filter at the end of the program, and – after a the program is executed – copy its outPoolSizes value to the input of a ChargeImageMemoryPools filter executed at the beginning. In some cases, this will improve the performance of the first iteration.
Using GPGPU/OpenCL Computing
Some filters in Aurora Vision Studio allow computations to be moved to an OpenCL–capable device, like a graphics card, in order to speed up execution. After proper initialization, OpenCL processing is performed completely automatically by suitable filters without changing their use pattern. Refer to "Hardware Acceleration" section of the filter documentation to find which filters support OpenCL processing and what are their requirements. Be aware that the resulting performance after switching to an OpenCL device may vary and may not always be a significant improvement relative to CPU processing. Actual performance of the filters must always be verified on the target system by proper measurements.
To use OpenCL processing in Aurora Vision Studio, the following is required:
- a processing device installed in the target system supporting OpenCL C language version 1.1 or greater,
- a proper and up-to-date device driver installed in the system,
- proper OpenCL runtime software provided by its vendor.
OpenCL processing is supported, for example, in the following filters: RgbToHsi, HsiToRgb, ImageCorrelationImage, DilateImage_AnyKernel.
To enable OpenCL processing in filters, an InitGPUProcessing filter must be executed at the beginning of a program. Please refer to that filter documentation for further information.
When to use Aurora Vision Library?
Aurora Vision Library is a separate product for C++ programmers. The performance of the functions it provides is roughly the same as of the filters provided by Aurora Vision Studio. There are, however, some important cases when the overall performance of the compiled code is better.
Case 1: High number of simple operations
There is an overhead of about 0.004 ms on each filter execution in Studio. That value may seem minimal, but if we consider an application that analyzes 50 blobs in each iteration and executes 20 filters for each blob, it may sums up to a total of 4 ms. This may already be significant. If this is only a small part of a bigger application, then User Filters might be the right solution. If, however, this is how the entire application works, then the library should be used instead.
Case 2: Memory re-use for big images
Each filter in Aurora Vision Studio keeps its output data on the output ports. Consecutive filters do not re-use this memory but instead create new data. This is very convenient for effective development of algorithms as the user can see all intermediate results. However, if the application performs complex processing of very big images (e.g. from 10 megapixel or line-scan cameras), then the issue of memory re-use might become critical. Aurora Vision Library may then be useful, because only at the level of C++ programming the user can have the full control over the memory buffers.
Aurora Vision Library also makes it possible to perform in-place data processing, i.e., modifying the input data directly instead of creating new objects. Many simple image processing operations can be performed in this way. Especially the Image Drawing functions and image transformations in small regions of interest may get a significant performance boost.
Case 3: Initialization before first iteration
Filters of Aurora Vision Studio get initialized in the first iteration. This is, for example, when the image memory buffers are allocated, because before the first image is acquired, the filters do not know how much memory they will need. Sometimes, however, the application can be optimized for specific conditions, and it is important that the first iteration is not any slower. On the level of C++ programming this can be achieved with preallocated memory buffers and with separated initialization of some filters (especially for 1D Edge Detection and Shape Fitting filters, as well as for image acquisition and I/O interfaces). See also: Application Warm-Up.
| Previous: Sorting, Classifying and Choosing Objects | Next: Understanding OrNil Filter Variants |