
You are here: Start » Program Examples » Button Presence
Button Presence
Aim:
The purpose of this example is to check whether all buttons are correctly placed on a board.
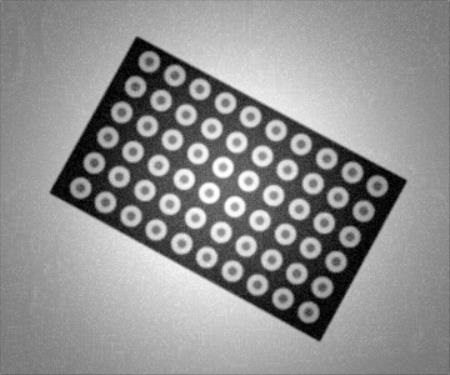
Input:
An image of a board that can appear at different positions and angles.
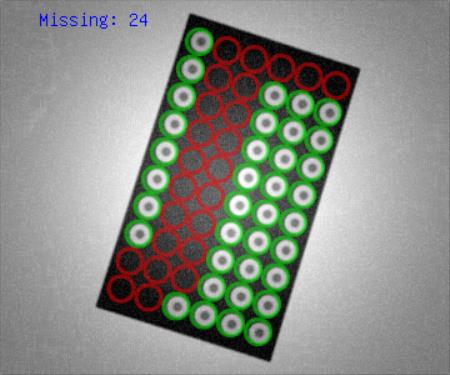
Output:
Detected missing buttons:
Hints:
Due to the variable board position, the region of interest must be aligned. In this case, it is highly recommended to verify the presence of buttons by analyzing pixel intensities in the specified region. You can create a grid of circles corresponding to each button. In other words, this grid should be an array of regions of interest.
Labeling connections is explained in this article.
You can learn how to enable sections here.
Solution (AVS):
-
Enable sections by clicking on the Show Sections (
 ) button.
 -
In Workspace Explorer, open the workspace Examples, and in Filmstrip window, select the ButtonPresence dataset. Drag the Image channel to the ACQUIRE section.
-
To find the position and orientation of the board, add the ThresholdToRegion filter to the PROCESS section and set its input inMax to 115. Since the PROCESS section should consist of key functionalities of the application, most of the tools will be placed here.
-
Create a rectangle containing the output region of the ThresholdToRegion by adding the RegionBoundingRectangle filter. The board is rectangular, thus the output rectangle outBoundingRectangle represents its boundaries.
-
Now, a coordinate system can be created by using the CreateCoordinateSystemFromRectangle. This is a very common way to obtain an alignment, since the Rectangle2D data type contains information about the position of the top-left corner and rotation of the rectangle.
-
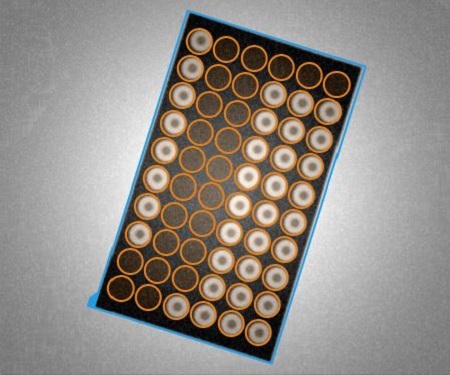
Once the alignment is created, it is time to create an array of ROIs. Add the CreatePointGrid filter to the INITIALIZE section and set its properties as follows:
- inPoint.X to 21 and inPoint.Y to 16,
- inRowCount to 6 and inColumnCount to 10,
- both inRowStep and inColumnStep to 23, since this is the distance between the centers of neighboring buttons.
-
To obtain a 2D array of circles, instead of the array of points, add the CreateCircle filter to the INITIALIZE section and connect its input inPoint to the outPointGrid. Set inRadius to 10. Please note that creating the grid of circles is not necessary in every cycle of the program. It can be done only once, during the first iteration. Therefore, filters responsible for setting values of constant parameters should be placed in the INITIALIZE section.
-
Inspection of buttons presence can be performed by the CheckPresence_Intensity filter. Add this filter to the PROCESS section and connect its inputs:
- inImage to the output of the ReadFilmstrip,
- inRoi to the output of the CreateCircle,
- inRoiAlignment to the output of the CreateCoordinateSystemFromRectangle.
-
By dragging and dropping the output outAlignedRoi to the preview, you can see the created grid with circles corresponding to each button.
-
Put the outContrast value on preview window and iterate the program once. Note that if a button is present, the contrast value is about 50. Otherwise, it is about 10. Therefore, set the inMinContrast to 20. The outIsPresent is an array of inspection results. Label that output as IsPresent.
-
To summarize the performed inspection, add the Empty formula filter and create two outputs. Note, that labeled outputs do not have to be connected to the formula to be used inside of it.
- In this expression, we concatenate 3 strings together using the + sign. First, we join the inFileName ** with missing:. Then, we need information about the number of missing objects. To get that, we use the count function. The not before the inIsPresent denotes that we are looking for the False** occurrences. Finally, we convert the extracted number into a string using the toString function.
InspectionResult = FileName + " missing: " + toString(count(not IsPresent))
- In this expression, we use a constructor of the StringLabel type. As the first argument, a text should be provided. In this case, it is the labeled output InspectionResult. As the second argument, the Point2D is needed. So, we use the Point2D constructor and specify the X and Y coordinates directly.
Label = StringLabel(InspectionResult, Point2D(10, 10))
-
Accumulate messages from all the iterations by adding the AccumulateElements and connecting its inElement input with the Formula's InspectionResult output.
-
Add the SaveTextLines filter to the FINALIZE section to save all the messages that include the inspection results.
- Connect its inTextLines input to the AccumulateElements outArray.
- Create an InspectionResults.txt file as a document for storing inspection messages.
- Set the inFile parameter's value to the path of the document.
Main

Used Filters
| Icon | Name | Description |
|---|---|---|
| AccumulateElements | Creates an array from elements appearing in many iterations. | |
| CheckPresence_Intensity | Quick and easy presence verification, e.g. for missing caps, screws, labels. | |
| CreateCircle | Creates a circle from an aligned point and radius. | |
| CreateCoordinateSystemFromRectangle | Most often used to define an object alignment from a filter like RegionBoundingRectangle. | |
| CreatePointGrid | Creates a grid of points. | |
| DrawShapeRegions_TwoColors | Usually: green or red for pass/fail status. | |
| RegionBoundingRectangle_OrNil | Computes the smallest rectangle containing a region; returns NIL if the region is empty. | |
| SaveTextLines | Saves text lines to a file. | |
| ThresholdToRegion | Extraction of a region of objects that can be defined by a salient brightness. |
Further Readings
- Local Coordinate Systems - This article describes basic concept of using the coordinate systems.