
You are here: Start » Program Examples » HMI Handling Events
HMI Handling Events
Aim:
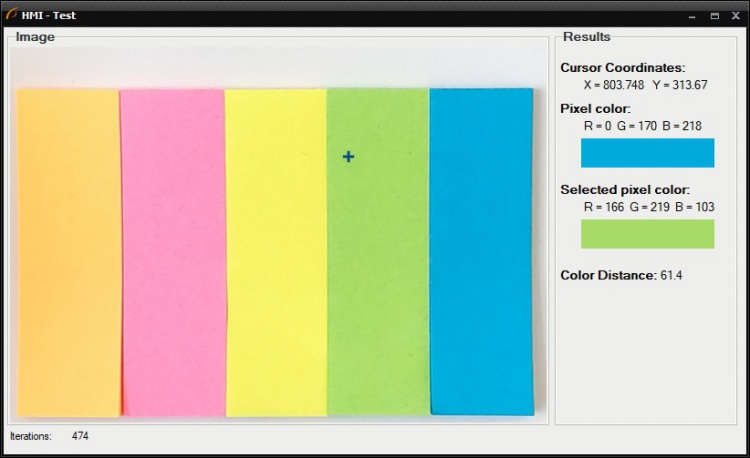
Create a functional HMI that allows users to pick a pixel using the cursor, check its color, and compare it with the previously selected pixel. Everything should be executed independently of the main loop.
Hints:
Use event-handling macrofilters to handle the mouse click and move events.
Solution (AVS):
Designing the user interface. Its layout can be similar to the one above, but feel free to play around and modify it as much as you like.
-
Open the HMI Designer by clicking its icon in the Application Toolbar.
-
Drag the GroupBox HMI Control from the "Containers" category and drop it onto the HMI Canvas. Set its Text property to Image.
-
Drag the View2DBox HMI Control from the "Indicators" category and drop it in the GroupBox. Set its Dock property to Fill so that the image will always fit the GroupBox.
-
Add another GroupBox to the HMI and set its Text property to Results. This control will contain HMI controls for displaying the current position of the cursor and the color of the selected pixel. Adjust its size if necessary.
-
Add four Label controls to the HMI and set their Text properties to Cursor Coordinates:, Pixel Color:, Selected Pixel Color: and Color Distance:.
-
Add four more Labels that will be used for displaying values corresponding to the labels from the previous point. Place them next to the corresponding labels.
-
Add the Panel control to the HMI and put it under the Pixel Color: Label. Later, we will create an algorithm that will set its color to the value of the selected pixel and allow us to display not only the numeric values of RGB channels but also the color they represent.
-
Add another Panel and put it under the Selected Pixel Color:.
-
Add two Labels and place them under the image preview. Set the Text property of the first one to Iterations:. The value of the second one will be set by the program in every iteration, and it will display the total number of executed iterations.
Before we move on, make sure that your HMI contains all the controls mentioned in points 1-9, as well as visible in the screenshot above. If they are all in place, we can start creating the algorithm.
-
Add the LoadImage filter to load a single image from a file. Place it in the ACQUIRE section.
-
Connect the outImage with the inImage input of the View2DBox HMI control.
-
Add the EnumerateIntegers filter to the ACQUIRE section. It will generate a loop and increase the iteration counter in every iteration. Connect its outValue output with the Label intended for displaying the iteration counter. Finally, set its inDelay input to 100 so that each iteration will last 100ms.
-
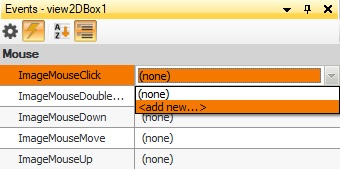
Now it is time to create an event-handling macrofilter that will be executed in response to the View2DBox's Click event (an event that occurs when the user clicks the left mouse button over the image). To create such a macrofilter, click the View2DBox on the HMI and then click the "lightning" icon in the Properties window. This will open the Events window where you will see all events that can be handled. Click the drop-down list next to the "ImageMouseClick" event and select <add new...> as shown below:
 Change the name of the new event handler to the View2DBox_ImageMouseClick in the pop-up window and click OK.
NOTE: There are many more events associated with this HMI Control. If you want to see the complete list, right-click on the View2DBox, select Edit Ports and Events Visibility... and go to the Events tab. -
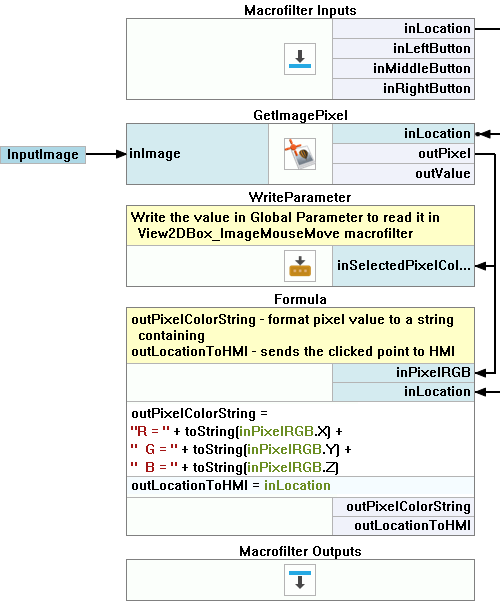
Now that we've set up the event handler, we can start creating the algorithm that will return the value of a pixel clicked in the image. Add the GetImagePixel filter to the View2DBox_ImageMouseClick event handler and connect the input of the handler to the GetImagePixel's inLocation. Put the filter in the PROCESS section.
-
As there is no image source inside the event handler, the input image has to be transferred from the main loop. We will do this by using a Global Parameter. To create one, click the Create New Global Parameter...
 button in the Project Explorer. Name it InputImage and choose the Image data type.
 -
To update the global parameter every time the image is acquired, add WriteParameter filter to the Main loop and click "Add input" on it. Next, select the InputImage from the list.
-
Connect the outImage with the inInputImage.
-
Return to the View2DBox_ImageMouseClick event handler. Drag the InputImage global parameter from the Project Explorer and drop it on the inImage.
-
Create a Formula to format RGB values into a String.
outPixelColorString = "R = " + toString(inPixelRGB.X) + " G = " + toString(inPixelRGB.Y) +In order to display the outPixelColorString on the HMI, connect it to the inText of the Label HMI Control (the one that is placed under the Selected Pixel Color:).
" B = " + toString(inPixelRGB.Z) -
Connect the inLocation input of the macrofilter with the formula. This will create an input of the same name and type.
-
Create another formula output to send the clicked point's location to the View2DBox HMI Control.
outLocationToHMI = inLocation -
Connect the outLocationToHMI with the inData1 input of the View2DBox HMI Control.
-
The next step is to set the color of Panel HMI Control to show the color of the selected pixel. Right-click on the Panel, select Edit Ports and Events Visibility... and check the inBackColor from the list. After clicking OK, you will notice that the inBackColor input became available, and you just need to connect the outPixel of the GetImagePixel to it.
-
Run the program and click on the image. The value of the clicked pixel should be displayed on the HMI.
-
Create a global parameter of the Pixel? data type and name it SelectedPixelColor.
-
Add the WriteParameter filter to the PROCESS section. Drag the outPixel, drop it on the WriteParameter and select the inSelectedPixelColor from the list. We will use this global parameter for setting up another event handler in the following steps.
-
Create a macrofilter that will handle the mouse movement over the View2DBox. You can do this the same way you did earlier with the View2DBox_ImageMouseClick event handler. Name it View2DBox_ImageMouseMove.
-
Add the Formula block to the PROCESS section.
- Connect the inLocation input of the macrofilter to the formula. An input of the same name and type will be created.
- Connect the SelectedPixelColor global parameter to the formula.
-
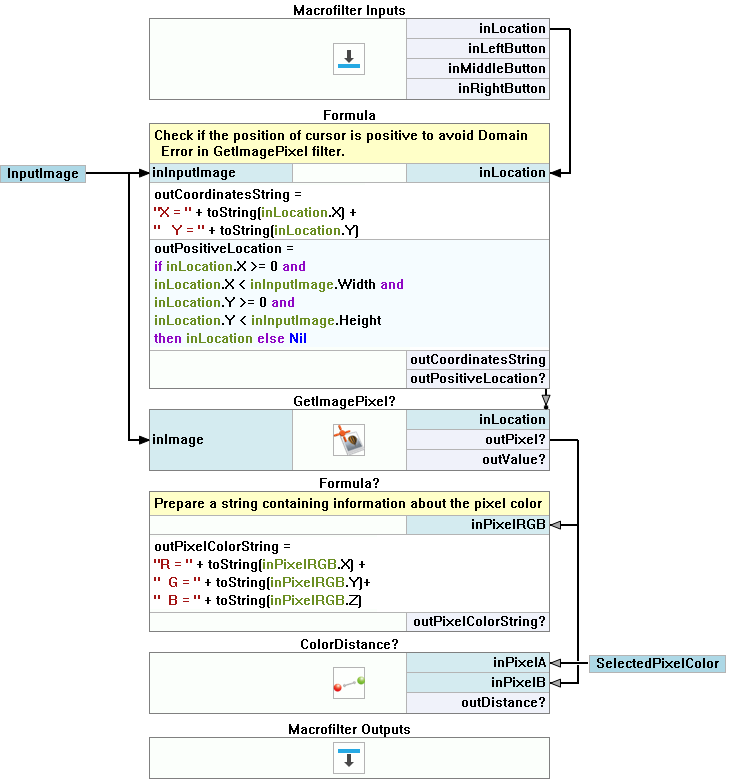
Now we will create the formula to format cursor position to a string and send it to the HMI:
outCoordinatesString = "X = " + toString(inLocation.X) + " Y = " + toString(inLocation.Y)Connect this output to the inText of the Label HMI Control (the one that is placed under the Cursor Coordinates:). -
In the case of a negative cursor position, the GetImagePixel filter will throw a Domain Error. To avoid this, create the following formula to ensure that only positive points are transferred to the GetImagePixel. Otherwise, a Nil value is returned and the filter is not executed.
outPositiveLocation =
 if inLocation.X >= 0
 and inLocation.X < inInputImage.Width
 and inLocation.Y >= 0
 and inLocation.Y < inInputImage.Height

then inLocation else Nil -
Add the GetImagePixel filter to the PROCESS section. Connect the InputImage global parameter to the inImage and the outPositiveLocation to the inLocation.
-
Connect the outPixel to the inBackColor of the second Panel HMI Control, just like in step 14.
-
Create the new Formula block, connect the outPixel to it, name the new input "inPixelRGB" and create the output that will format the outPixel to String:
outPixelColorString = "R = " + toString(inPixelRGB.X) + " G = " + toString(inPixelRGB.Y) +Connect this output to the inText of the Label HMI Control (the one that is placed under the Pixel Color:).
" B = " + toString(inPixelRGB.Z) -
The last step is to compare the previously clicked pixel with the current one. To do this, add the ColorDistance to the program.
- Connect the SelectedPixelColor to the inPixelA.
- Connect the outPixel to the inPixelB.
- Connect the outDistance to the inText of the Label HMI Control (the one that is placed next to the Color Distance:).
Macrofilter Main

Macrofilter View2DBox_ImageMouseClick
Macrofilter View2DBox_ImageMouseMove
Used Filters
| Icon | Name | Description |
|---|---|---|
| ColorDistance | Color comparison insensitive to changes of illumination. | |
| EnumerateIntegers | In each consecutive iteration produces a consecutive number from an arithmetic sequence. | |
| GetImagePixel | Returns a single pixel of an image. | |
| LoadImage | Loads a single image from a file. |