
You are here: Start » Machine Vision Guide » Optical Character Recognition
Optical Character Recognition
Introduction
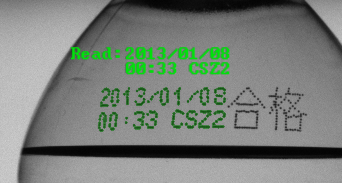
Result of data extraction using OCR.
Optical Character Recognition (OCR) is a machine vision task consisting in extracting textual information from images.
State of the art techniques for OCR offer high accuracy of text recognition and invulnerability to medium grain graphical noises. They are also applicable for recognition of characters made using dot matrix printers. This technology gives satisfactory results for partially occluded or deformed characters.
Efficiency of the recognition process mostly depends on the quality of text segmentation results. Most of the recognition cases can be done using a provided set of recognition models. In other cases a new recognition model can be easily prepared.
Concept
OCR technology is widely used for automatic data reading from various sources. It is especially used to gather data from documents and printed labels.
In the first part of this manual usage of high level filters will be described.
The second part of this manual shows how to use standard OCR models provided with Adaptive Vision Studio. It also shows how to prepare an image to get best possible results of recognition.
The third part describes the process of preparing and training OCR models.
The last part presents an example program that reads text from images.
Using high level Optical Character Recognition filters
Adaptive Vision Studio offers a convenient way to extract a text region from an image and then read it using a trained OCR classifier.
The typical OCR application consists of the following steps:
- Find text position – locate the text position using template matching,
- Extract text – use the filter ExtractText to distinct the text form the background and perform its segmentation,
- Read text – recognizing the extracted characters with the ReadText filter.
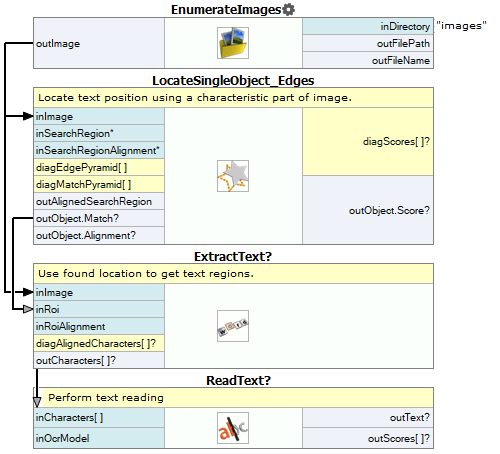
Example OCR application using high level filters.
Adaptive Vision Studio provides convenient graphical tools for configuring the OCR process. More informations can be found in the following articles:
Details on Optical Character Recognition technique
Reading text from images
In order to achieve the most accurate recognition it is necessary to perform careful text extraction and segmentation. The overall process of acquiring text from images consists of the following steps:
- Getting text location,
- Extracting text from the background,
- Segmenting text,
- Using prepared OCR models,
- Character recognition,
- Interpreting results,
- Verifying results.
The following sections will introduce methods used to detect and recognize text from images. For better understanding of this guide the reader should be familiar with basic blob analysis techniques.
Getting text location
In general, text localization tasks can be divided into three cases:
- The location of text is fixed and it is described by boxes called masks.
For example, the personal identification card is produced according to the formal specification.
The location of each data field is known.
A well calibrated vision system can take images in which the location of the text is almost constant.
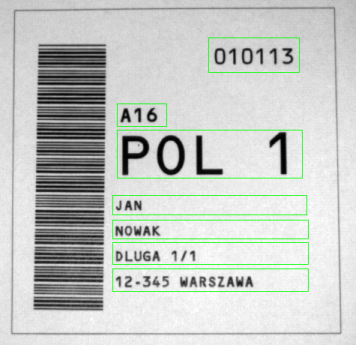
An example image with text masks.
- Text location is not fixed, but it is related to a characteristic element on the input images or to a special marker (an optical mark). To get the location of the text the optical mark has to be found. This can be done with template matching, 1D edge detection or other technique.
-
The location of text is not specified, but characters can be easily separated from the background with image thresholding.
The correct characters can then be found with blob analysis techniques.
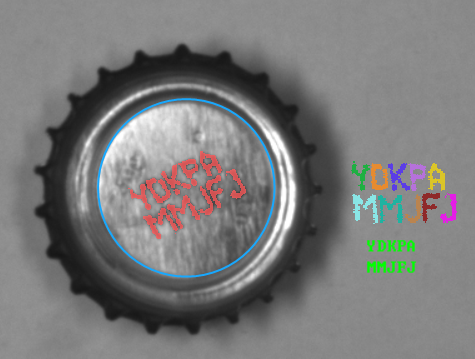
Getting text from a bottle cap.
When the text location is specified, the image under analysis must be transformed to make text lines parallel to the X-axis. This can be done with RotateImage, CropImageToRectangle or ImageAlongPath filters.
Extracting text from the background
A major complication during the process of text extraction may be uneven light. Some techniques like light normalization or edge sharpening can help in finding characters. The example of light normalization can be found in the example project Examples\Tablets. The presentation of image sharpening using the Fourier transform can be found in the Examples\Fourier example.

Original image.

Image after light normalization.

Image after low-frequency image damping using the Fourier transform.
Text extraction is based on image binarization techniques. To extract characters, filters like ThresholdToRegion and ThresholdToRegion_Dynamic can be used. In order to avoid recognizing regions which do not include characters, it is advisable to use filters based on blob area.
|

|
Sample images with uneven light.

|
|
Results of ThresholdToRegion and ThresholdToRegion_Dynamic on images with uneven light.
At this point the extracted text region is prepared for segmentation.
Segmenting text
Text region segmentation is a process of splitting a region into lines and individual characters. The recognition step is only possible if each region contains a single character.
Firstly, if there are multiple lines of text, separation into lines must be performed. If the text orientation is horizontal, simple region dilation can be used followed by splitting the region into blobs. In other cases the text must be transformed, so that the lines become horizontal.

The process of splitting text into lines using region morphology filters.
When text text lines are separated, each line must be split into individual characters. In a case when characters are not made of diacritic marks and characters can be separated well, the filter SplitRegionIntoBlobs can be used. In other cases the filter SplitRegionIntoExactlyNCharacters or SplitRegionIntoMultipleCharacters must be used.

Character segmentation using SplitRegionIntoBlobs.

Character segmentation using SplitRegionIntoMultipleCharacters.
Next, the extracted characters will be translated from graphical representation to textual representation.
Using prepared OCR models
Standard OCR models are typically located in the disk directory C:\ProgramData\Adaptive Vision\{Adaptive Vision Product Name}\PretrainedFonts.
The table below shows the list of available font models:
| Font name | Font typeface | Set name | Characters |
|---|---|---|---|
| OCRA | monospaced | AZ | ABCDEFGHIJKLMNOPQRSTUVWXYZ.-/ |
| AZ_small | abcdefghijklmnopqrstuvwxyz.-/ | ||
| 09 | 0123456789.-/+ | ||
| AZ09 | ABCDEFGHIJKLMNOPQRSTUVWXYZ0123456789.-/+ | ||
| OCRB | monospaced | AZ | ABCDEFGHIJKLMNOPQRSTUVWXYZ.-/ |
| AZ_small | abcdefghijklmnopqrstuvwxyz.-/ | ||
| 09 | 0123456789.-/+ | ||
| AZ09 | ABCDEFGHIJKLMNOPQRSTUVWXYZ0123456789.-/+ | ||
| MICR | monospaced | ABC09 | ABC0123456789 |
| Computer | monospaced | AZ | ABCDEFGHIJKLMNOPQRSTUVWXYZ.-/ |
| AZ_small | abcdefghijklmnopqrstuvwxyz.-/ | ||
| 09 | 0123456789.-/+ | ||
| AZ09 | ABCDEFGHIJKLMNOPQRSTUVWXYZ0123456789.-/+ | ||
| DotMatrix | monospaced | AZ | ABCDEFGHIJKLMNOPQRSTUVWXYZ+-./ |
| AZ09 | ABCDEFGHIJKLMNOPQRSTUVWXYZ+-01234556789./ | ||
| 09 | 01234556789.+-/ | ||
| Regular | proportional | AZ | ABCDEFGHIJKLMNOPQRSTUVWXYZ.-/ |
| AZ_small | abcdefghijklmnopqrstuvwxyz.-/ | ||
| 09 | 0123456789.-/+ | ||
| AZ09 | ABCDEFGHIJKLMNOPQRSTUVWXYZ0123456789.-/+ |
Character recognition
Adaptive Vision Library offers two types of character classifiers:
- Classifier based on multi-layer perceptron (MLP).
- Classifier based on support vector machines (SVM).
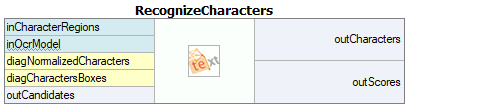
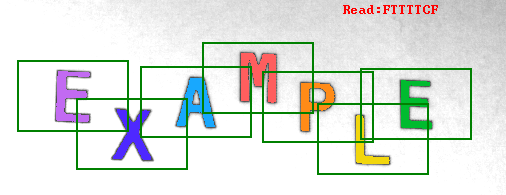
Both of the classifiers are stored in the OcrModel type. To get a text from character regions use the RecognizeCharacters filter, shown on the image below:
 |
The first and the most important step is to choose the appropriate character normalization size. The internal classifier recognizes characters using their normalized form. More information about character normalization process will be provided in the section describing the process of classifier training.
The character normalization allows to classify characters with different sizes. The parameter inCharacterSize defines the size of a character before the normalization. When the value is not provided, the size is calculated automatically using the character bounding box.
| Character presentation | Characters after normalization | Description |
|---|---|---|
 |
 |
The appropriate character size is chosen. |
 |
 |
The size of character is too small. |
 |
 |
Too much information about a character is lost because of too large size has been selected . |
Next, character sorting order must be chosen. The default order is from left to right.
If the input text contains spaced characters, the value of inMinSpaceWidth input must be set. This value indicates the minimal distance between two characters between which a space will be inserted.
Character recognition provides the following information:
- the read text as a string (outCharacters),
- an array of character recognition scores (outScores),
- an array of recognition candidates for each character (outCandidates).
Interpreting results
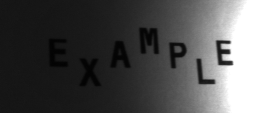
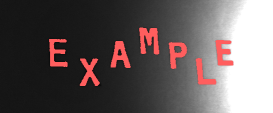
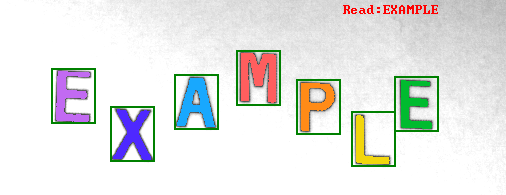
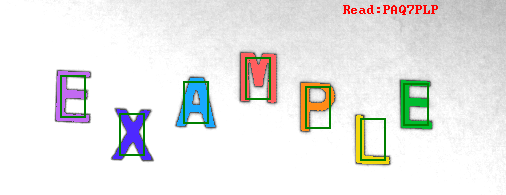
The table below shows recognition results for characters extracted from the example image. An unrecognized character is colored in red.
| Original character |
Recognized character |
Score | Candidates (character and accuracy) |
|
|---|---|---|---|---|
| (outCharacters) | (outScores) | (outCandidates) | ||
| E | E | 1.00 | E: 1.00 | |
| X | X | 1.00 | X: 1.00 | |
| A | A | 1.00 | A: 1.00 | |
| M | M | 1.00 | M: 1.00 | |
| P | R | 0.50 | R: 0.90 | B: 0.40 |
| L | L | 1.00 | L: 1.00 | |
| E | E | 1.00 | E: 1.00 | |
In this example the letter P was not included in the training set. In effect, the OCR model was unable to recognize the representation of the P letter. The internal classifier was trying to select most similar known character.
Verifying results
The results of the character recognition process can be validated using basic string manipulation filters.
The example below shows how to check if a read text contains a valid year value. The year value should be greater than 2012 (e.g. production started in this year) and must not be greater than the current year.
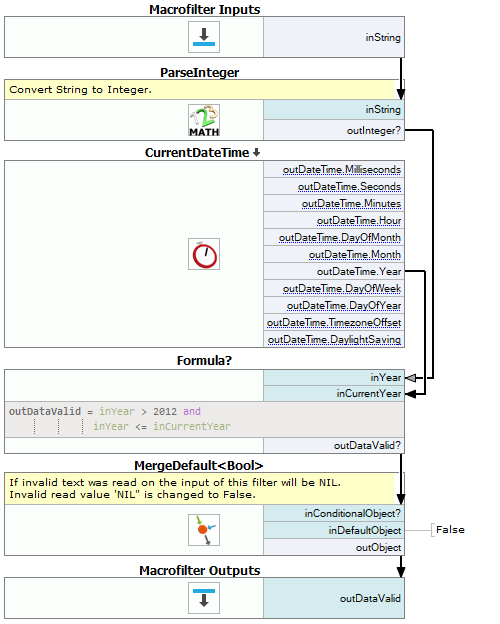
The short year value validation. |
This example consists of two parts. In the first part an input string is converted to an Integer value. The second one checks if year number is valid. The filter ParseInteger was used to convert a text into a number of the Integer type. ParseInteger can return Nil value so MergeDefault filter should be used to decide what is a validation result when invalid year number was provided. Next, the year number is checked using a formula. To get the current year the filter CurrentDateTime is used. If all conditions are met, the validation passes. |
For more complex validation a user defined filter is recommended. For further information read the documentation on creating user filters.
Preparation of the OCR models
An OCR model consists of an internal statistical tool called a classifier and a set of character data. There are two kinds of classifiers used to recognize characters. The first classifier type is based on the multilayer perceptron classifier (MLP) and the second one uses support vector machines (SVM). For further details please refer to the documentation of the MLP_Init and the SVM_Init filters. Each model must be trained before it can be used.
The process of OCR model training consists of the following steps:
- preparation of the training data set,
- selection of the normalization size and character features,
- setup of the OCR model,
- training of the OCR model,
- saving results to a file.
When these steps are performed, the model is ready to use.
Preparation of the training data set

Synthetic characters generated by means of a computer font.
Character samples acquired from a real usage.
Each classifier needs character samples in order to begin the training process. To get the best recognition accuracy, the training character samples should be as similar as possible to those which will be provided for recognition. There are two possible ways to obtain sample characters: (1) extraction of characters from real images or (2) generation of artificial characters using computer fonts.
In the perfect world the model should be trained using numerous real samples. However, sometimes it can be difficult to gather enough real character samples. In this case character samples should be generated by deforming the available samples. A classifier which was trained on a not big enough data set can focus only on familiar character samples at the same time failing to recognize slightly modified characters.
Example operations which are used to create new character samples:
- region rotation (using the RotateRegion filter),
- shearing (ShearRegion),
- dilatation and erosion (DilateRegion, ErodeRegion),
- addition of a noise.

The set of character samples deformed by: the region rotation, morphological transforms, shearing and noises.
Note: Adding too many deformed characters to a training set will increase the training time of a model.
Note: Excessive deformation of character shape can result in classifier inability to recognize the learnt character base. For example: if the training set contains a C character with too many noises, it can be mistaken for O character. In this case the classifier will be unable to determine the base of a newly provided character.
Each character sample must be stored in a structure of type CharacterSample. This structure consists of a character region and its textual representation. To create an array of character samples use the MakeCharacterSamples filter.
Selection of normalization size and character features
The character normalization allows for reduction of the amount of data used in the character classification. The other aim of normalization is to enable the classification process to recognize characters of various sizes.
During normalization each character is resized into a size which was provided during the model initialization. All further classifier operations will be performed on the resized (normalized) characters.

Various size characters before and after the normalization process.
Selection of too large normalization size will increase training time of the OCR classifier. On the other hand, too low size will result in loss of important character details. The selected normalization size should be a compromise between classification time and the accuracy of recognition. For the best results, a character size after normalization should be similar to its size before normalization.
During the normalization process some character details will be lost, e.g. the aspect ratio of a character. In the training process, some additional information can be added, which can compensate for the information loss in the normalization process. For further information please refer to the documentation of the TrainOcr_MLP filter.
Training of the OCR model
There are two filters used to train each type of an OCR classifier. These filters require parameters which describe the classifier training process.
 |
 |
| Training of MLP classifier using TrainOcr_MLP. | Training of SVM classifier using TrainOcr_SVM. |
Saving the training results
After successful classifier training the results should be saved for future use. The filter SaveObject should be used.
Example: Reading numbers from masks
The purpose of this example is to read fields from ID cards. The input data is extracted from real cases. The example consists of two parts:
- Creation of data set for classifier training is presented in "TrainCharacters" macrofilter.
- This macrofilter is designed to acquire data from provided masks. It is implemented in the "Main" macrofilter.
The example project is available in Examples\Ocr Read Numbers directory.
Training the classifier
|
First, this filter LoadImage loads the character images from separate files. File names are stored in a global parameter called FileNames. |
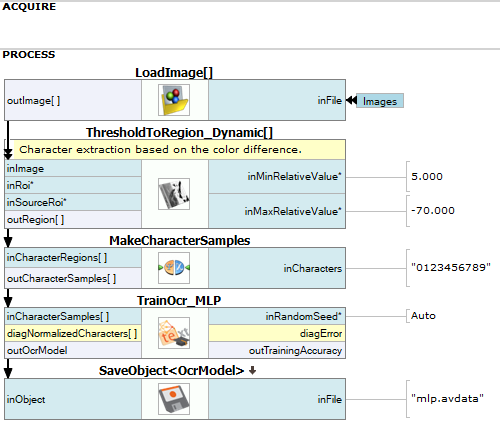
Macrofilter definition which performs OCR training. |
Reading data from images
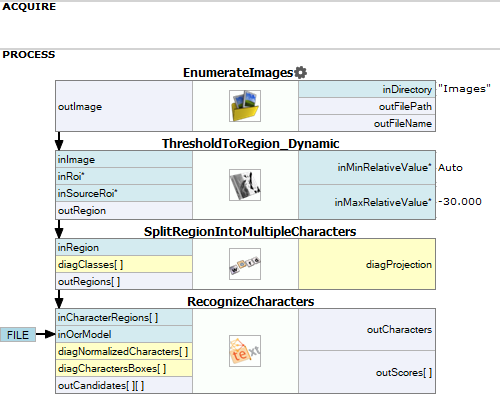
Macrofilter which uses the trained classifier to acquire text from images. |
First, the example image is loaded from a file. |
| Previous: Local Coordinate Systems | Next: Camera Calibration and World Coordinates |