You are here: Start » Getting Started » Using Library on Android
Using Library on Android
Aurora Vision Library for Android is available for selected customers only. The Android build of the library, its Deep Learning runtime and the accompanying demo application are distributed on request. Contact the Aurora Vision team to obtain access, the native libraries and a trial license.
Overview
Aurora Vision Library is written in C++ and can be executed on Android devices through the Android NDK.
A typical application is built as an Android app in which the Java/Kotlin layer handles the user
interface and camera preview, while all vision processing is implemented in a native (JNI) layer
that links against the library.
This article uses the Deep Learning OCR demo (DL_OCR) as a working reference.
The demo reads text from the device camera using Aurora Vision Deep Learning
Reading Characters.
Requirements
- Android device with an arm64-v8a (ARMv8-A, 64-bit) processor and a back-facing camera.
- Android 12 (API level 30) or newer.
- Development tools:
- Android Studio (recommended IDE, includes the Android SDK and platform tools).
- Android NDK - the demo is verified with NDK
23.1.7779620. - Gradle build system (a
gradlewwrapper is provided with the demo). - Android platform tools (
adb) for installing and inspecting the app from a terminal. - A C++17 capable toolchain (bundled with the NDK).
Distribution package
The Android distribution provides the native shared libraries and the C++ headers needed to compile
an application. In the demo these are placed under the deps/ directory:
deps/avl/lib/- core library (libAVL.so) and its dependencies (libexif.so,libiconv.so).deps/avl/include/- library header files (AVL.hand others).deps/dl/lib/- Deep Learning runtime (libAVLDL.so,libDL_Kit.so,libOnnxRuntimeApi.soand the accompanying inference back-end libraries).deps/dl/include/- Deep Learning header files (AVLDL.h).
All .so files are packaged into the APK as native libraries for the
arm64-v8a ABI. No system-wide installation is performed on the device.
Project configuration
The native library is compiled with CMake, driven by Gradle through the
externalNativeBuild block. The essential settings from the demo are:
android {
    defaultConfig {
        minSdk 30
        ndk {
            abiFilters 'arm64-v8a'          // 64-bit ARM only
        }
        externalNativeBuild {
            cmake { cppFlags '-std=c++17' }
        }
    }
    externalNativeBuild {
        cmake { path file('src/main/cpp/CMakeLists.txt') }
    }
}
To link the native code against the library, in CMakeLists.txt:
- add
deps/avl/includeanddeps/dl/includeto the include directories, - declare each prebuilt
.soas anIMPORTEDshared library, and - link your native library against them with
target_link_libraries.
include_directories(${avl_path}/include)
include_directories(${dl_path}/include)

add_library(avl-lib SHARED IMPORTED)
set_target_properties(avl-lib PROPERTIES
    IMPORTED_LOCATION ${avl_path}/lib/libAVL.so)

add_library(avldl-lib SHARED IMPORTED)
set_target_properties(avldl-lib PROPERTIES
    IMPORTED_LOCATION ${dl_path}/lib/libAVLDL.so)

target_link_libraries(your-native-lib
    avl-lib avldl-lib
    # ... remaining DL and system libraries ...
)
Program development
As on the desktop platforms, the most convenient way to develop the vision algorithm is to build it in Aurora Vision Studio on Windows, generate C++ code and then interface that code with the native layer of the Android application. The native layer exposes its functionality to the Java layer through JNI. In the OCR demo the native entry points return the device Computer ID, deploy the OCR model once and run inference on each camera frame:
avl::GetComputerID(computerID);                    // read the license Computer ID
avl::DL_ReadCharacters_Deploy(..., model_handle);  // load the OCR model once
avl::DL_ReadCharacters(rgb_image, roi, ...);       // run OCR on a frame
Camera frames are captured with the CameraX API in the Java layer, passed to the native layer as a byte buffer, processed by the library and returned as an image with the recognized characters.
Building and installing the demo
Point the build at your local Android SDK by setting sdk.dir in local.properties:
sdk.dir=C:\\Users\\<user>\\AppData\\Local\\Android\\Sdk
Open the project in Android Studio and use Run, or build and deploy from a terminal:
- Build the APK:
gradlew build - Install on a connected device:
adb install ./app/build/outputs/apk/debug/app-debug.apk - Start the app:
adb shell am start -n com.zebra.ztest/.MainActivity
When the application starts for the first time, grant all requested permissions (camera and "All files access" storage permission). The storage permission is required so the app can read the license file, see Licensing below.
Licensing and configuration
A valid license is required to run the library. For the Deep Learning OCR demo the license must include both the Aurora Vision Library and the Deep Learning products. Each license is bound to a device by its Computer ID. The configuration steps are:
- Install and start the demo, granting all requested permissions.
- Read the Computer ID shown on the application screen. It can also be read from the device
log:
adb logcat | grep "Computer id" - Open the User Area at
https://www.adaptive-vision.com/en/user_area/licenses/
and request a Trial License for Aurora Vision Library and Deep Learning
(or select a license already assigned to your account).
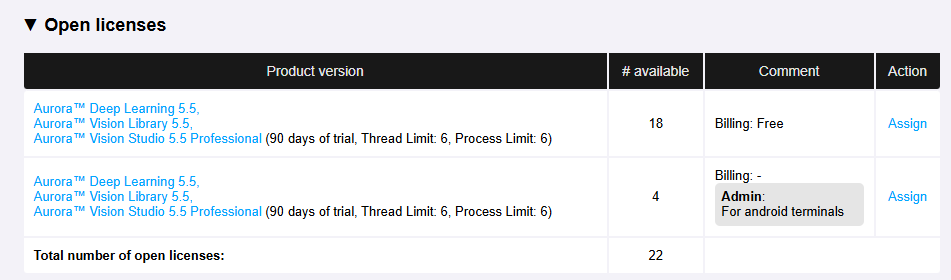
- Click Assign, paste the Computer ID copied from the device (add a comment if needed) and save.
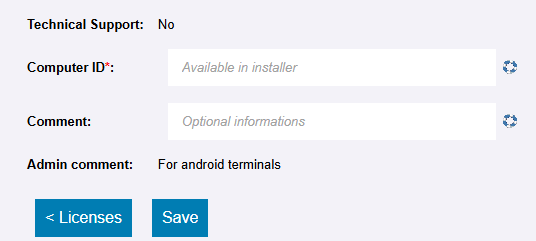
- Download the license by clicking License Key. The result is an
.avkeyfile.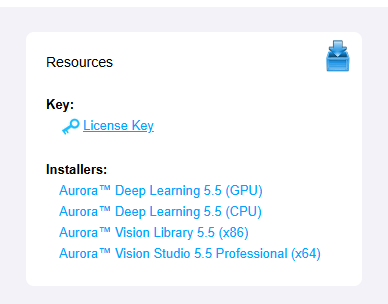
- Copy the
.avkeyfile to theAVSfolder in the root of the device internal storage (/sdcard/AVS):- Connect the device with a USB cable and select File Transfer mode.
- Open the device in the file explorer and paste the
.avkeyfile into theAVSfolder in the root directory (create it if it does not exist). - Alternatively, drag & drop the file with the Android Studio Device Explorer.
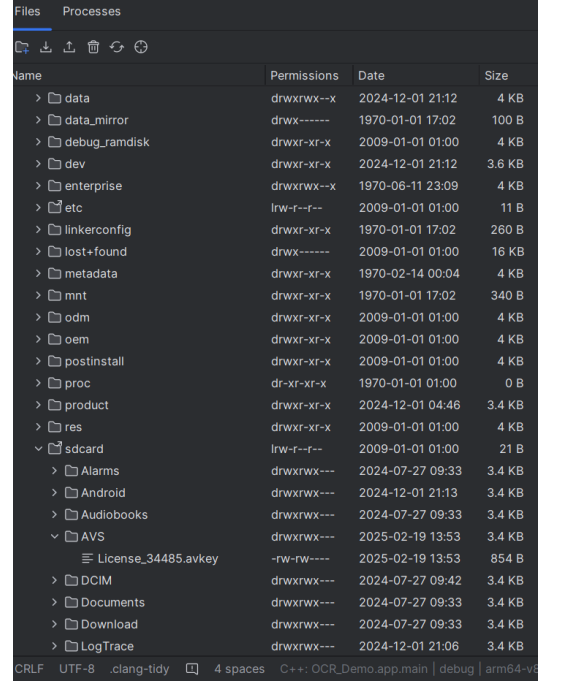
- Restart the application. On start-up the demo copies every
.avkeyfile from/sdcard/AVSinto its private license directory and activates the license.
A single device may hold several licenses; place all of the .avkey files in
/sdcard/AVS. Results saved by the demo are also written to the /AVS folder.
Troubleshooting
Could not activate product: 'DL_OCR'
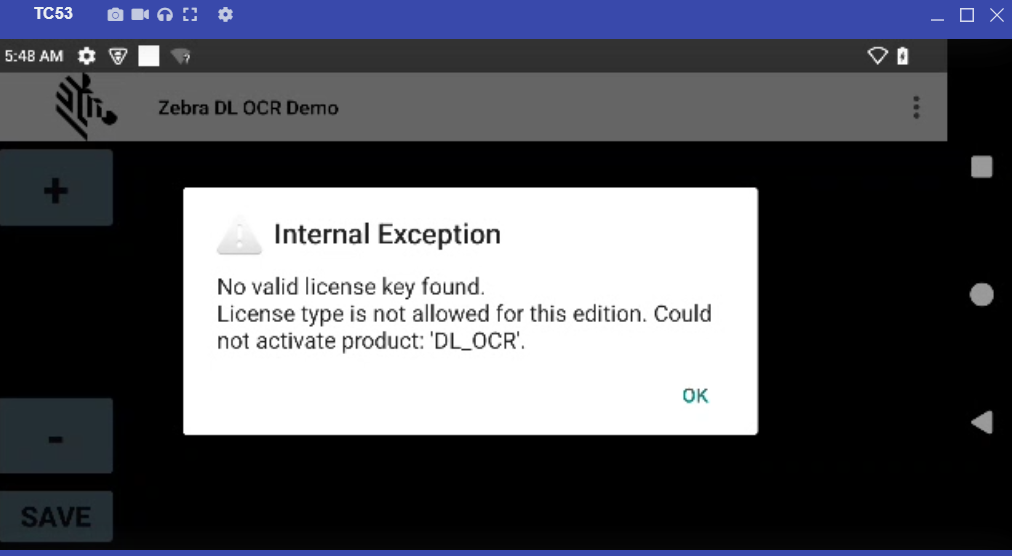
No valid license key found.
License type is not allowed for this edition. Could not activate product: 'DL_OCR'.
The installed license key most likely does not include the DL_OCR / Deep Learning license.
A Aurora Vision Library license alone is not sufficient to run Deep Learning tools such as OCR.
Request a license that also covers Deep Learning from the User Area, assign it to the device
Computer ID, download the new .avkey file, copy it to /sdcard/AVS and
restart the application.
License key exceeded its validity period. Error code: 3
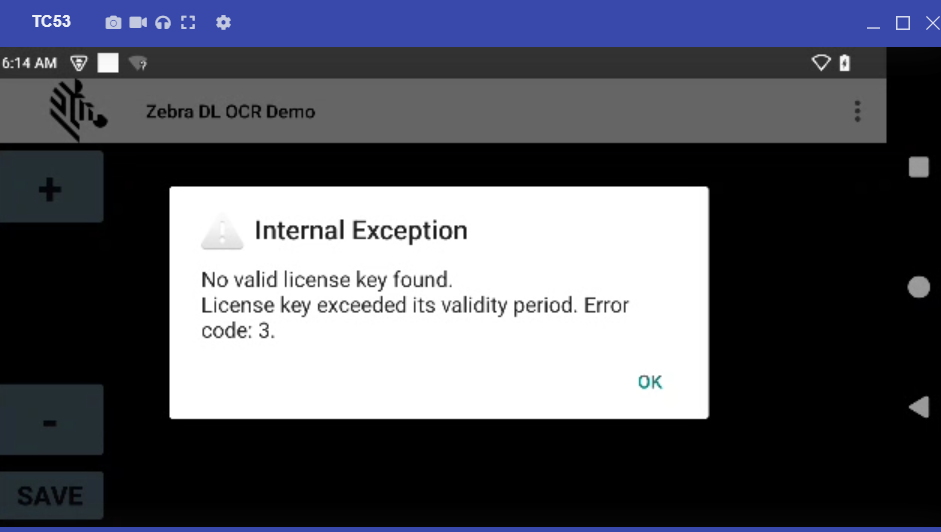
No valid license key found.
License key exceeded its validity period. Error code: 3.
The license appears to be outside its validity period. A common cause on a mobile terminal is that the device clock is not synchronized - there is a date/time difference between the moment the license was generated and the current date/time on the device. Verify the device date, time and time zone (enabling automatic network-provided time is recommended), then restart the application. If the license has genuinely expired, request a new one from the User Area.
Dark screen, no camera preview
The left half of the screen stays black and no live image is shown. This is most often caused by a missing camera permission. Grant the camera permission when prompted, or enable it manually in the system application settings ("Permissions" → "Camera"), then restart the application. Make sure the device has a working back-facing camera that is not in use by another application.
License is missing or in the wrong place
No .avkey file was found in /sdcard/AVS. Make sure the license file was copied
into the AVS folder in the root of the device internal storage, that the app was granted the
"All files access" storage permission, and that the file is assigned to the Computer ID shown by the app.
Permission denied when reading the license directory
filesystem error: in directory_iterator: Permission denied
The app was not granted access to external storage. Grant the "All files access" permission in the system application settings and restart the application.
SDK location not found
SDK location not found. Define a valid SDK location with an ANDROID_HOME environment
variable or by setting the sdk.dir path in your project's local.properties file.
The build cannot locate the Android SDK. Set sdk.dir to the Android SDK location in the
local.properties file of the project.
| Previous: Using User Filters on Linux | Next: Using Python Wrapper |