
You are here: Start » User Interface » Managing Projects with Project Explorer
Managing Projects with Project Explorer
Introduction
Project Explorer is a window displaying elements which are contained in the currently opened project:
- Modules
- Macrofilters (definitions)
- Global Parameters
- User Filter libraries
- Attachments
Its main goal is to provide a single place to browse, add, remove, rename or open the items, which are grouped into categories in the same way as the filters in the Filter Catalog. A category may correspond to a standard module or to a module of a User Filter library. There is also one special category, Attachments, which appears when the user adds an external file to the project (it might be for example a text document with a piece of documentation).
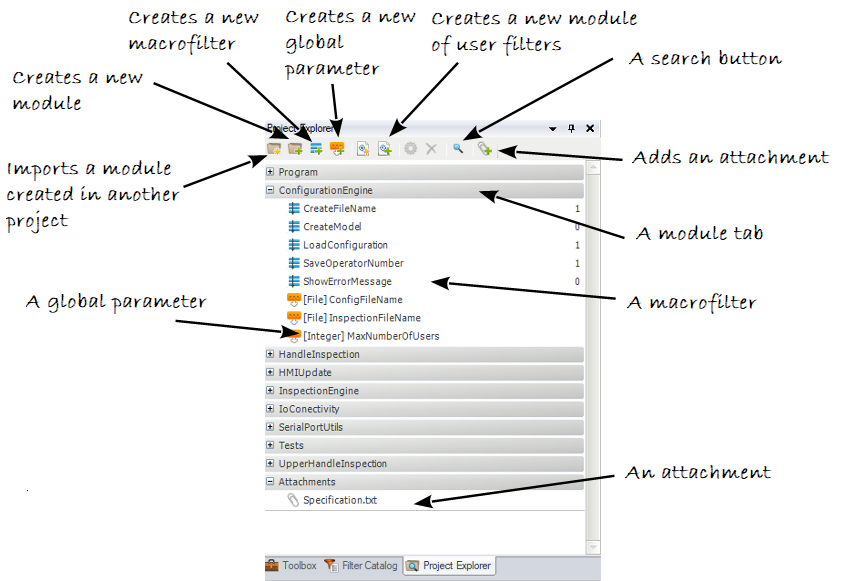
Modules in the Project Explorer.
Opening Macrofilters
As described in Running and Analysing Programs, there are two ways of navigating through the existing macrofilters. One of them is with the Project Explorer window, which displays classes (definitions) of macrofilters, not the instances. After double-clicking on a macrofilter in the Project Explorer, however, a macrofilter instance is opened in the Program Editor. As one macrofilter class can have zero, one or many instances, some special rules apply to which of the instances it is:
- If possible, the most recently executed instance is opened.
- If no instance has been executed yet, the most recently created one is opened.
- If there are no instances at all the "ghost instance" is presented, which allows editing the macrofilter, but will never have any data on the output ports.
Global Parameters
If some value is used many times in several different places of a program, then it should be turned into a global parameter. Otherwise, consecutive changes to the value will require the error-prone manual process of finding and changing all the occurrences. It is also advisable to use global parameters to clearly distinguish the most important values from the project specification – for example the expected dimensions and tolerances. This will make a program much easier to maintain in future.
In Adaptive Vision Studio global parameters belong to specific modules and are managed in the Project Explorer.
To create one, click the Create New Global Parameter...  button
and then a dialog box will appear, where you will provide the name, the type and the value of the new item.
After a global parameter is created it can be dragged-and-dropped on filter inputs and appropriate connections
will be created with a visual label displaying the name of the parameter.
button
and then a dialog box will appear, where you will provide the name, the type and the value of the new item.
After a global parameter is created it can be dragged-and-dropped on filter inputs and appropriate connections
will be created with a visual label displaying the name of the parameter.
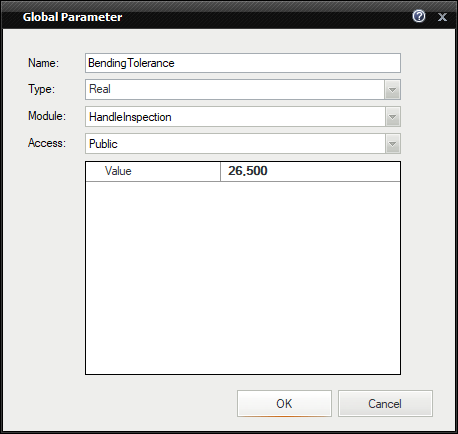
Creating a global parameter.

Global parameter used in a program.
Global parameters contained in a project can also be edited in the Properties window after being selected in the Project Explorer or in the Program Editor.
Remarks:
- Connected filters are not re-executed after the global parameter is changed. This is due to the fact, that many filters in different parts of the program can be connected to one global parameters. Re-executing all of them could cause unexpected non-local program state changes and thus is forbidden.
Modules
When a project grows above 10-20 macrofilters it might be appropriate to divide it into several separate modules, each of them would correspond to some logical part. It is advisable to create separate modules for things like i/o communication, configuration management or for automated unit testing. Macrofilters and global variables will be then grouped in a logical way and it will be easier to browse them.
Modules are also sometimes called "libraries of macrofilters". This is because they provide a means to develop sets of common user's tools that can be used in many different projects. This might be very handy for users who specialize in specific market areas and who find some standard tasks appearing again and again.
To create a module, click the Create New module...  button and then a dialog box will appear. In there you specify the location and name of the module.
The path may be absolute or relative.
button and then a dialog box will appear. In there you specify the location and name of the module.
The path may be absolute or relative.
After creating a module you may move already existing macrofilters into the module by dragging them onto the module in Project Explorer.
If you create a new macrofilter by clicking the Create New Macrofilter...  button you may choose the module to which it belongs.
You can also make the macrofilter private. Private macrofilters cannot be directly used outside its module.
Right clicking a filter and selecting Edit properties...
button you may choose the module to which it belongs.
You can also make the macrofilter private. Private macrofilters cannot be directly used outside its module.
Right clicking a filter and selecting Edit properties...  allows to modify their properties, including access, after their creation.
The image below shows a structure of an example program. The macrofilters have been grouped into two Modules. Module FindDefects has macrofilters related to defect detection and a global parameter used by the macrofilters. Notice how the ProcessImage macrofilter is grayed out. It indicates it is a private macrofilter (here it is used by FindShapeDefects). ProcessImage cannot be used outside its module.
The other module has macrofilters related to showing and storing the results of the inspection.
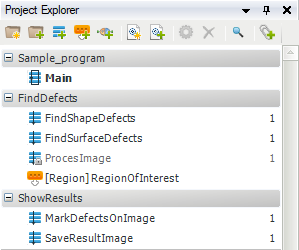
Example program structure with macrofilters grouped into modules.
Here are some guidelines on how to use modules in such situations:
- Create a separate module for each set of related, standard macrofilters.
- Give each module a unique and clear name.
- Use the English language and follow the same naming conventions as in the native filters.
- Create the common macrofilters in such a way, that they do not have to be modified between different projects and only the values of their parameters have to be adapted.
- If some of the macrofilters are intended as implementation only (not to be used from other modules), mark them as private.
Importing Modules
If you want to use a module which had been created before click the Import Existing Module...  .
This will open a window in which you can select modules to add. Now the path to the module will be linked to the project. Similarly to creating a new module you can choose whether the path to it will be relative or absolute.
.
This will open a window in which you can select modules to add. Now the path to the module will be linked to the project. Similarly to creating a new module you can choose whether the path to it will be relative or absolute.
Remember that modules are separate files and as such can be modified externally. This is especially important with modules which are shared between multiple projects at the same time.
See also: Trick: INI File as a Module Not Exported to AVEXE.
| Previous: Performing General Calculations | Next: Keyboard Shortcuts |