
You are here: Start » Program Examples » Blister Inspection (NET GmbH)
Blister Inspection (NET GmbH)
Aim:
The task is to detect missing and broken pills in a blister.
Input:
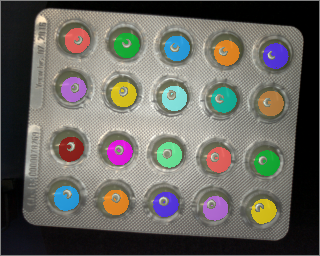
An image of a blister. The position of the object is variable, but limited.
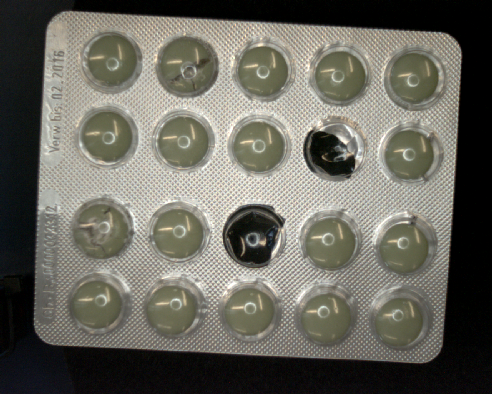
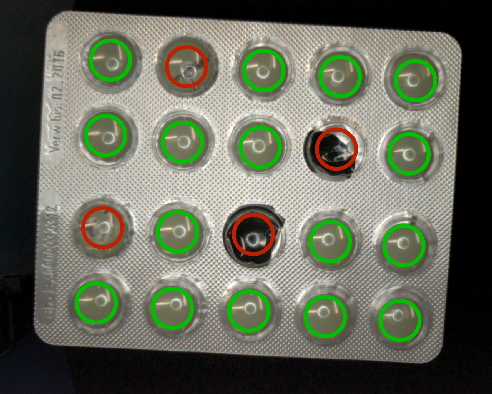
Output:
Detected missing and broken pills:
Hints:
As variations of the object positions are limited, it can be located accurately with a very standard and fast Shape Fitting approach. With the two FitSegmentToEdges filters, it is possible to locate the top and the left edges. The found rectangle can be used as a reference for further inspections.
In this case, pills can be easily found using high level tools for color analysis like the CheckPresence_PixelAmount.
Labeling connections is explained in this article.
Solution (AVS):
-
Create a variant macrofilter GrabImage with a forking port inSource of type String.
-
Add two variants, Files and Camera, and create an output of type Image.
-
To the variant Files, add the EnumerateImages to get images from a directory. Connect the filter output to the GrabImage macrofilter output.
-
To the variant Camera, add the GigEVision_GrabImage filter to get images from your camera. If your camera does not support the GigE Vision standard, use the other filter. Connect the filter output to the GrabImage macrofilter output.
-
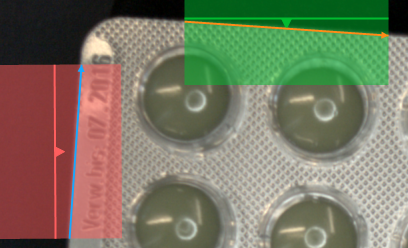
To find the blister, horizontal and vertical edges must be found using a Shape Fitting technique. Add 2 FitSegmentToEdges filters and setup scanning paths like in the image below. Set the inEdgeScanParams.EdgeTransition to DarkToBright.
-
To find the top-left point of the blister, the segments must be converted to lines. The top-left point will be the intersection of lines created from the found segments. Add the LineLineIntersection and connect the found segments.
-
To create the reference CoordinateSystem2D, add the CreateCoordinateSystemFromPoint and connect its inPoint to the previously created LineLineIntersection output, and its inAngle to the outSegment.Direction of the upper found segment.
-
Label the outCoordinateSystem as the CoordinateSystem.
-
When the reference system is found, places containing pills should be set. Create a new global parameter of type Circle2DArray and name it Circles.
-
Set theCircles value like in the image below. these circles will be used to determine whether a marked pill is damaged or not.
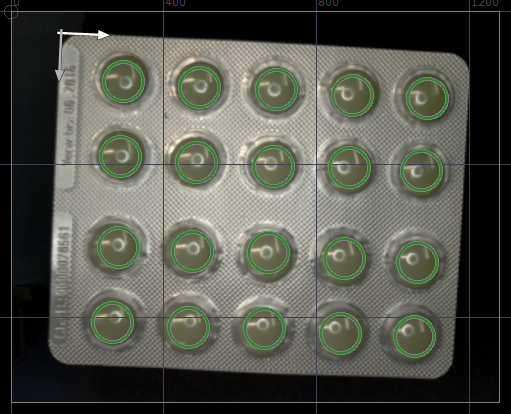
Remember to set the CoordinateSystem output as the Coordinate system in the Circle Editor.
-
To improve color analysis, the input image should be blurred. Blurring makes colors on the image more uniform. Add the filter SmoothImage_Gauss and set inStdDevX to 3.0.
-
Check the presence of the pill using the filter CheckPresence_PixelAmount.
- Set inBeginHue to 26.
- Set inEndHue to 52.
- Set inMinSaturation to 42.
- Set inMaxSaturation to Auto.
- Set inMinBrightness to 62.
- Set inMaxBrightness to Auto.
- Set inMinAmount to 0.8.
- Set inMaxAmount to Auto.
Selected colors can be found in the outForeground output. The result is showed in the image below.
-
Connect Circles to CheckPresence_PixelAmount.inRoi and CoordinateSystem to CheckPresence_PixelAmount.inRoiAlignment.
-
Use the filter DrawShapeRegions_MultiColor to draw the results. Use data from the outIsPresent and outAlignedRoi.
Macrofilter Main

Macrofilter GrabImage(Files) loads images from a directory.

Macrofilter GrabImage(Camera) gets images from the camera using the GigEVision interface.

Used Filters
| Icon | Name | Description |
|---|---|---|
| CheckPresence_PixelAmount | Quick and easy presence verification, e.g. for missing caps, screws, labels. | |
| CreateCoordinateSystemFromPoint | Most often used to define an object alignment from results of 1D Edge Detection or Blob Analysis. | |
| DrawShapeRegions_MultiColor | Draws shape regions on an image with multiple colors. | |
| EnumerateImages | Emulates image acquisition with images stored on disk. | |
| FitSegmentToEdges | Precise detection of a straight edge, whose rough location is known beforehand. | |
| GigEVision_GrabImage | The most recommended filter for working with GigE Vision devices. | |
| LineLineIntersection | Computes a common point of two lines. | |
| SmoothImage_Gauss | Removal of gaussian noise from images. |
Further Readings
- Local Coordinate Systems - This article describes basic concept of using the coordinate systems.
- Shape Fitting - This article presents usage of the Shape Fitting technique.
- Shape Fitting Filter Group - List of all filters used to perform Shape Fitting.