
You are here: Start » Application Notes » Interacting with GigEVision cameras
Interacting with GigEVision cameras
Introduction
The following guide provides information on how to utilize a GigE-compliant camera in Aurora Vision Studio.
While the guide focuses on the GigE protocol most of the content can also apply with slight changes to different camera protocols, especially GenICam.
Basic Image Acquisition
The simplest scenario, in which cameras are utilized in Aurora Vision Studio, is continuous synchronous acquisition.
Continuous means that the camera acquires new images by itself - it does not need to be triggered to do so.
Synchronous means that the program will wait for a new image until it is acquired - the iteration will not be finished without a new image.
The steps to perform such acquisition are as follows:
- Connect the camera to the computer or network switch. If the camera is to be powered through Power-Over-Ethernet (PoE), make sure that it is connected to a device capable of supply power that way.
- In a new program in Aurora Vision Studio add the filter GigEVision_GrabImage.
- Open the editor of the inAddress input and set the camera address.
- If the camera is displayed with a warning sign, it means it is not in the computer's subnet. This can be solved by assigning a temporary IP address the camera.
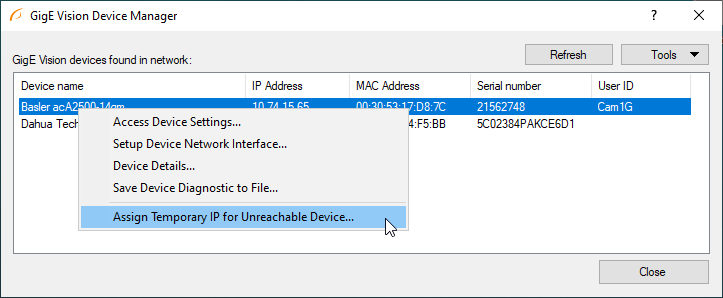
- When the camera is in the same subnet, it is possible to change its settings (for example changing its static IP).
- If the camera is connected but not detected you may open the window (from point a), manually type the camera MAC address and assign it another IP address. The menu can be opened from the Tools menu.
- If the camera is displayed with a warning sign, it means it is not in the computer's subnet. This can be solved by assigning a temporary IP address the camera.
- Now you can run the program. Previewing the outImage will show you the view from the camera.
Changing camera parameters
You can change camera parameters programmatically using SetParameters filters. To demonstrate this, we will expand the previous program.
- Add a GigEVision_SetRealParameter filter and set its inAddress to the same address as GigEVision_GrabImage.
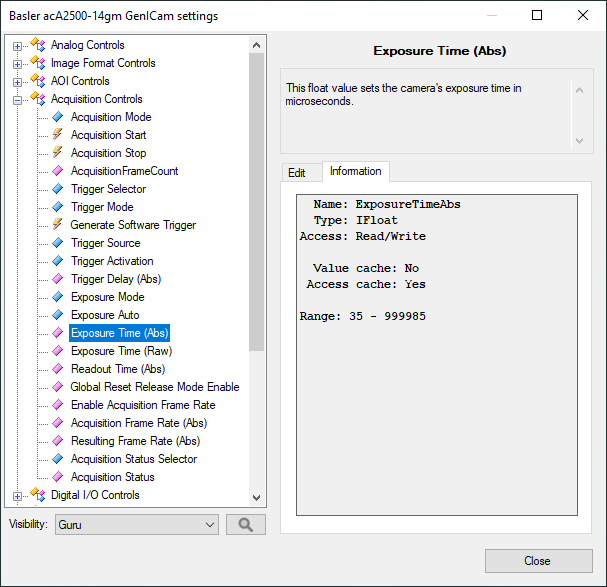
- Specify the parameter name. If you are not sure about the name you can select through the GigEVision device tree. To do that click on the "..." button near the inParameterName.
- Here you can see all available camera parameters with a short description. Select the parameter with name Exposure Time (Abs) (or similar if not present). As you can see it controls the camera exposure time in microseconds and its type is IFloat.
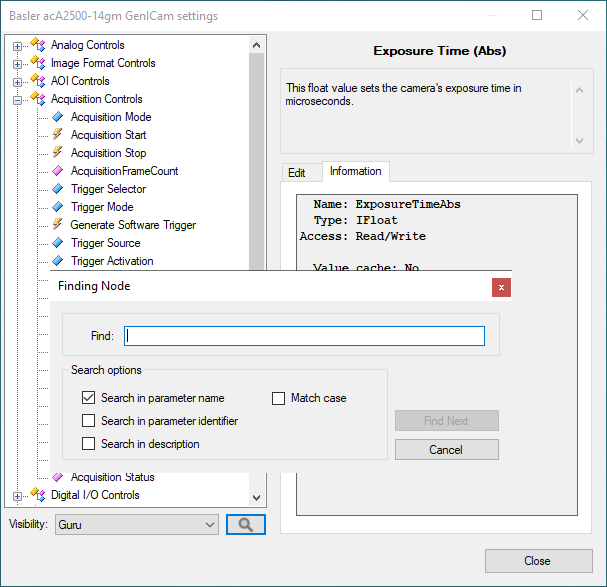
- If you cannot find the parameter try using the search function (the magnifying glass icon)
- The type of the filter needs to match the type of the parameter. The exception is that IFloat is represented as Real in Aurora Vision Studio.
- Some more advanced parameters may not be visible unless Visibility is set to the correct level.
- If you cannot find the parameter try using the search function (the magnifying glass icon)
- Make sure that the parameter ExposureAuto is set to Off. Otherwise, it will not be possible to manually change the exposure value.
- Before closing the window note the minimum and maximum values of exposure time. After selecting the parameter, set the inValue to the lowest acceptable value.
- Run the program. While running, steadily increase the inValue input. You will notice that the camera image gets brighter and brighter.
- Try not to go outside the acceptable range. It will result in an error if the input inVerify is set to True.
- It is also possible to check a parameter's value by using GigEVision_GetParameter filters. Try adding one in the Float variant and specifying the same name as in the previous filter.
- You many notice that not always the read value is equal to inValue of SetParameter. It is because the camera modifies it.
With GigEVision_GetParameter filters it is not only possible to check editable parameters but also to check read-only ones. For example, if the camera was set to automatically adjust exposure, the current exposure time might be useful to know. Another example would be to read parameters holding device-specific information, such as the maximum image size.
For some quick testing you may also want to set parameters directly in the GigEVision tree.
It is important to note that while most parameters are stored in volatile memory and as such will reset after unplugging the camera from power. There are some parameters that are stored in non-volatile memory, such as Device User ID, but they usually do not affect the acquisition directly.
Because of this, it is recommended to design the program in such a way that every parameter with a value different from the default is set programmatically.
Starting and stopping acquisition
It is important to note that not all parameters can be changed while the acquisition is running. Some require stopping the acquisition and restarting it.
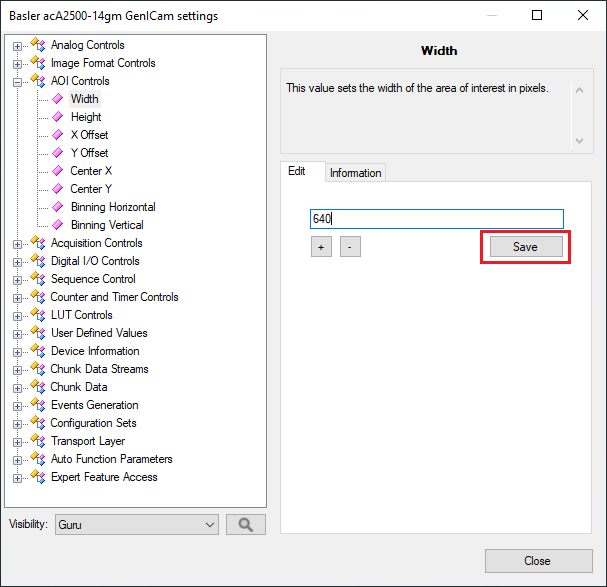
- Run the program and open the device tree (Tools -> Manage GigE Vision Devices...). Find the Width parameter. You will notice that the save button is grayed out due to running acquisition.
- Add another GigEVision_SetIntegerParameter filter and select the Width parameter. You may notice that it is greyed out.
- While selecting the parameter check the information tab. There may be additional information about possible value, e.g. increment. Some parameters can only take value that are multiples of certain numbers, like 2 or 4.
- Enter 240 as inValue and run the program. You will encounter an error saying that the parameter is not writeable.
- Now add a GigEVision_StopAcquisition before the previous Set filter and rerun the program.
- The parameter is now set without errors and the output image is smaller.
As you can see the Width parameter was not writable while the acquisition was running. Stopping the acquisition before changing the parameter made it writable.
You may also notice that we have a filter to explicitly stop the acquisition but there is not filter to explicitly start it. GigEVision_GrabImage will attempt use an ongoing acquisition but if none is present it will start a new one.
While it is acceptable for simple programs, it should be avoided when the status of the acquisition is program-controlled.
Now we will make a proper program out of this.
- Start with removing the filters added in this chapter.
- Now select the rest and extract a task macrofilter (called MainLoop) from them. This will be the main acquisition loop.
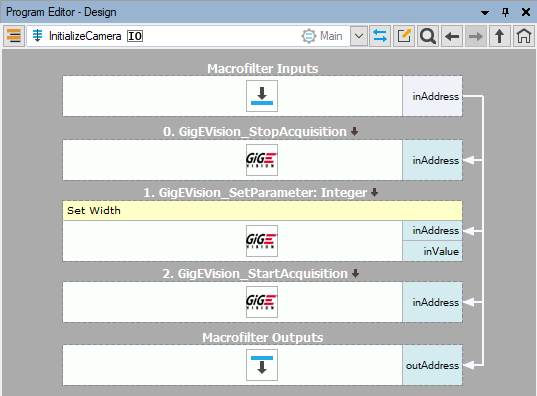
- Create a new step macrofilter called InitializeCamera and add it before MainLoop in INITIALIZE section.
- In InitializeCamera add the three following filters GigEVision_StopAcquisition, GigEVision_SetIntegerParameter (select Width parameter) and GigEVision_StartAcquisition.
- Set the width to the maximum possible value.
- Drag inAddress of any of the filter to the top bar to create a new input. Then add an output of the same type and connect it to the input.
- Go up one level and drag the outAddress output to the MainLoop filter creating a new input.
- Inside that filter connect the newly created input to all the GigE filters
- Now every GigE filter in the whole program shares the same camera address.
- The final program should look like this:
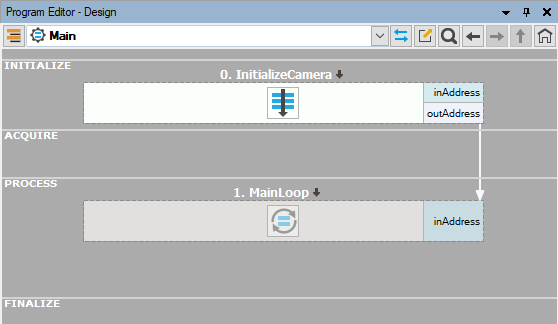

Now the program is divided into two parts. The first part is executed once, after that the program enters MainLoop which run continuously until the program is stopped.
The parameters that can be changed during acquisition are set in the InitializeCamera filter where the acquisition is guaranteed to be stopped.
All the other parameters are set in MainLoop.
In real applications not all parameters need to be changed during runtime. Even then they probably will only be changed from time to time, not in every iteration.
For instance, specifying if the camera will run continuously in trigger mode will likely be done only once (even though it can be set during acquisition). Exposure time might be changed multiple times.
It is good practice to have all the parameters that are set only once in one macrofilter (like InitializeCamera) regardless of if they required acquisition to be stopped.
The parameters changed from time to time should be set in a variant macrofilter.
The reason of that is time-saving. Setting the parameter to the same value does not take much time (Aurora Vision Studio caches previous values and avoids resending the same ones), but if we have a lot of parameters it adds up. It is also more intuitive if one-off parameters are in a dedicated filter.
It is important to note how the cameras work in Aurora Vision Studio. When the acquisition is started Aurora Vision Studio creates a background thread which buffers incoming frames in memory. This thread persists until the acquisition is stopped or the application exits the task that started the acquisition.
For example, if InitializeCamera was a task and not a step macrofilter the acquisition would stop when exiting it and it would have to be restarted in MainLoop.
Also, instead of passing the camera address as a parameter it is possible to put it into a global parameter.
Changing trigger mode - basic
While the default mode of most cameras is continuous acquisition very often it is more desirable to only acquire new images after a certain signal, i.e. trigger.
Not only you have more control over the acquisition time of each frame, less frequent acquisition requires smaller bandwidth.
To demonstrate triggered acquisition, we will use the current program.
Run the program, ensure that you have displayed the camera image in the preview.
- Now open the GigeVision device tree and find the parameter Trigger Mode. Set it to On. Also make sure that Trigger Selector is set to Frame Start.
- You will notice that no new images are grabbed by the camera.
- Find the Trigger Source parameter and set it to Software.
- Find the Generate Software Trigger command (commands feature the lightning bolt icon) and execute it.
- A new image will be grabbed by the camera.
You may also want to have an external trigger (for example, an output from a PLC). Then you must select the appropriate Trigger Source, e.g. Line1.
You may also have to ensure that the signal matches what the camera expects. The Trigger Activation parameter specifies what value will the camera look for.
Changing trigger mode - advanced
Very often we want the trigger properties to be controlled directly by the program. For example, the camera may be triggered in one part of the program but also acquire images continuously in another part. Or maybe the camera is to be triggered by different sources depending on the program state.
Trigger parameters can be changed during acquisition. Therefore, it is possible to change them on-the-fly.
Now we will prepare a more advanced program which initializes the camera and allows the user to change how the camera is triggered and the exposure time from the HMI while the program is running.
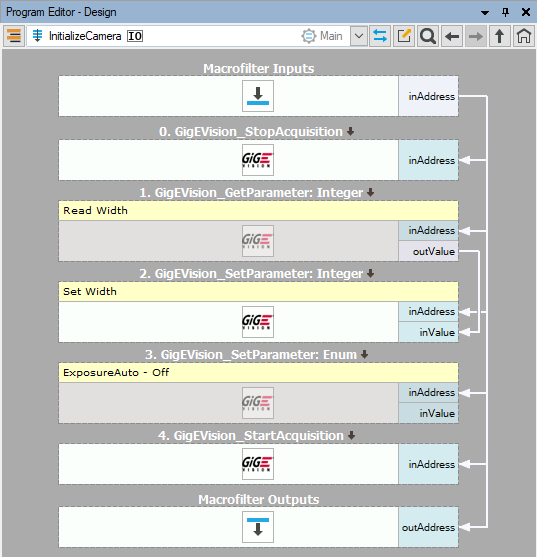
- To ensure that the camera will be set to use Software as the source of trigger, add a GigEVision_SetEnumParameter filter in the InitializeCamera (before GigEVision_StopAcquisition). Through the Device Manager choose the TriggerSource parameter and set inValue to Software.
- Now repeat the previous step, changing the parameter to ExposureAuto and set its value to Off.
- Since different cameras may have different acceptable maximum width you may want to add a GigEVision_GetIntegerParameter filter that would read the parameter WidthMax in device information. Connect its output to the filter that changes the Width.
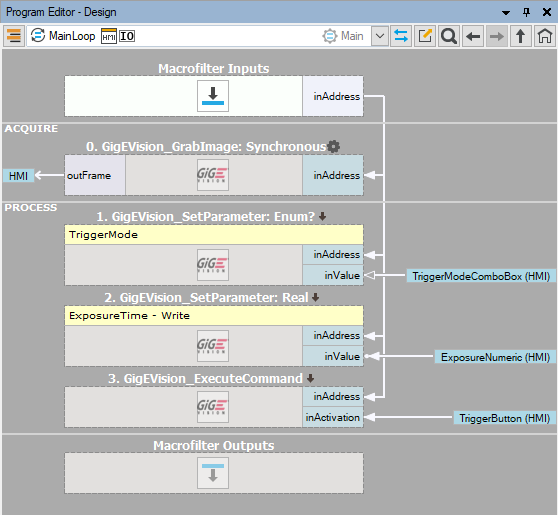
- Now we will modify the contents of MainLoop worker task. We want to be able to change trigger mode and to execute a software trigger.
- Add an instance of GigEVision_SetEnumParameter. Connect it to the camera address and select Trigger Mode as its parameter
- Add a GigEVision_ExecuteCommand filter, connect them to the camera address. Through Device Manager select parameter TriggerSoftware.
- Move all those filters to PROCESS section and add GigEVision_GrabImage to ACQUIRE section.
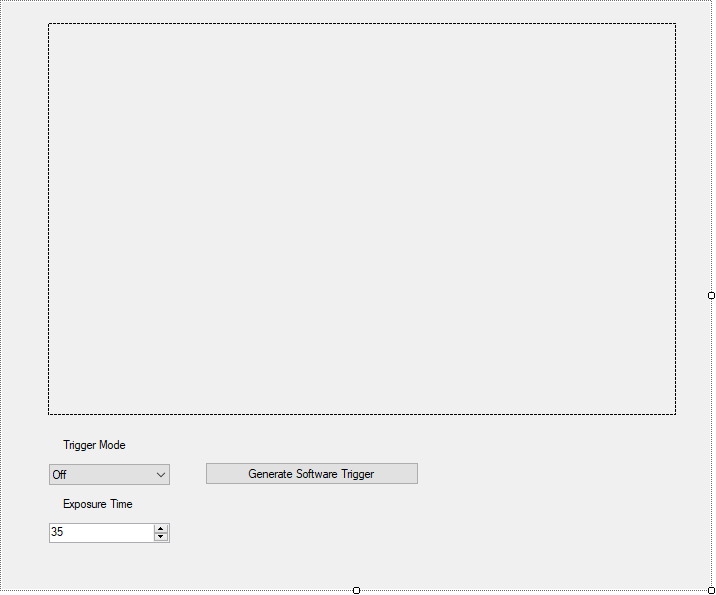
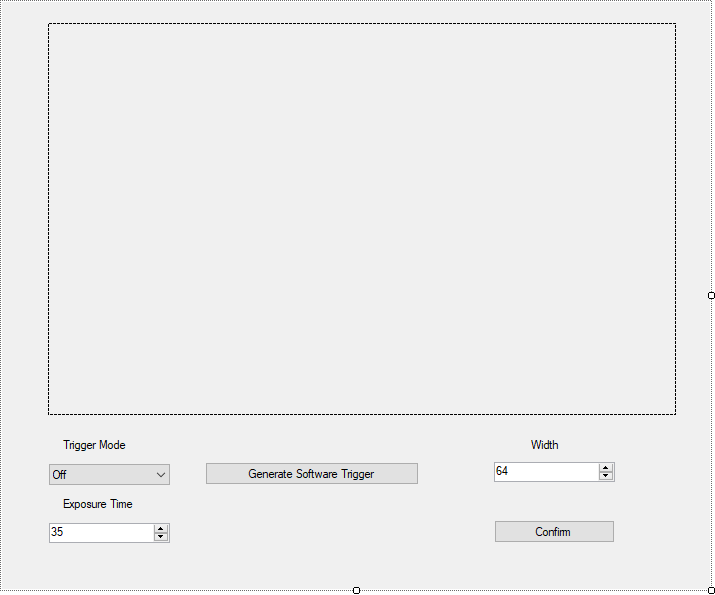
- Let's design an HMI. In this case it will feature:
- View2DBox - which will display the camera image;
- ComboBox - for selecting trigger mode;
- NumericUpDown - to control exposure time;
- ImpulseButton - to generate software trigger;
- Labels - to label other controls.
- Now we will configure the controls:
- View2DBox - change its InitialSizeMode to FitToWindow and connect to GrabImage's outImage;
- ComboBox (for trigger mode)
- Connect outText to inValue of Set Parameter for TriggerMode;
- Expand List in Data category in Properties and add the following item: On, Off;
- Set Selection to 0
- ImpulseButton - connect its outValue to ExecuteCommand's inValue;
- NumericUpDown:
- Connect outValue to inValue of SetParameter for ExposureTime;
- Set Minimum and Maximum to the values specified in the Device Tree for that parameter (for the camera used while writing this note the values were 35 and 999985.
- The program should display the camera image on the HMI. You should be able to change the exposure time. However, when you change the ComboBox's value to On, the program will freeze. Clicking the trigger button will not do anything.
- This is caused by the fact that GrabImage is in its synchronous variant. The program cannot get past GrabImage and execute a trigger, so it waits for an image indefinitely.
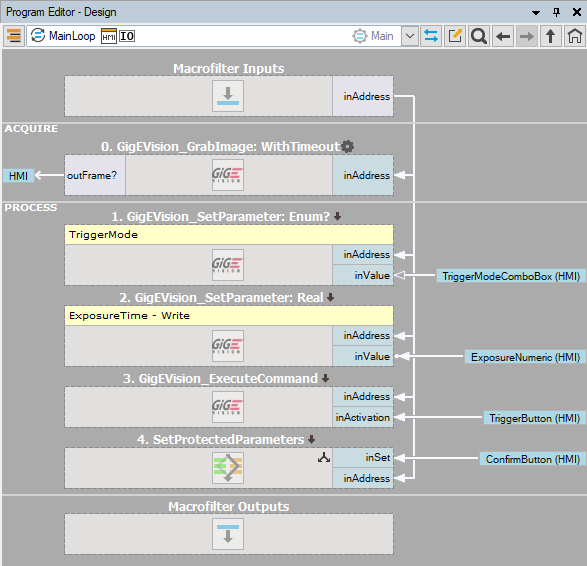
- To solve that we can change GigEVision_GrabImage variant to GigEVision_GrabImage_WithTimeout. Now the program will only attempt grabbing for a specified amount of time. Let's set inTimeout to 100ms and rerun the program.
- Now the program does not freeze when setting triggered mode on. If no image is grabbed in 100ms GrabImage returns Nil and the program proceeds to the next iteration, where the camera may be triggered.
- Generally, if the camera is meant to acquire images only from time to time, it is a good idea to use the WithTimeout variant of GrabImage. It prevents program hang-ups in case of camera problems and allows you to inform the user that the camera may not be working correctly. However, the rest of the program must be designed in a way that handles Nil images properly.
We can now expand the program to enable the user to change other parameters, including those which require acquisition to be off.
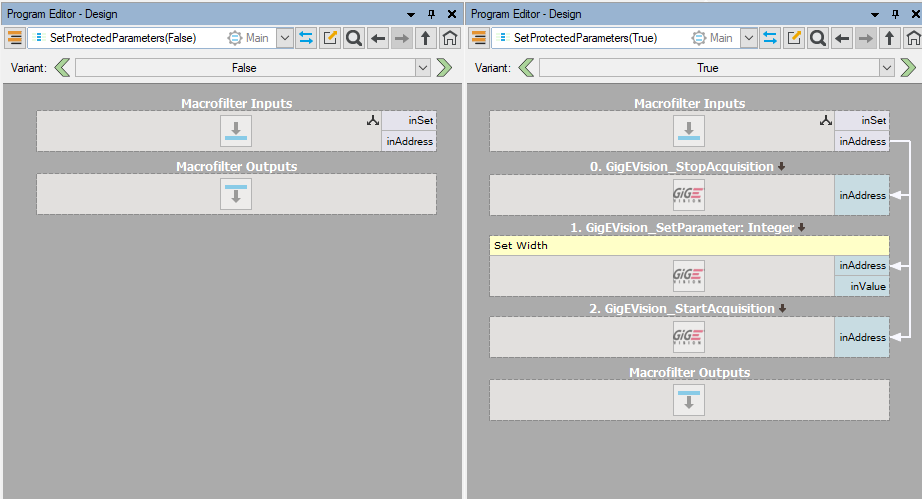
- Create an empty variant macrofilter inside MainLoop and choose Bool as the fork type. Drag the camera address to the filter to create an input.
- Enter the filter and choose the variant True. Add a StopAcquisition filter, followed by a SetParameter filter in variant Integer and select Width parameter. After them add a StartAcquisition filter. Connect all filters to the camera address.
- In the HMI add two new controls:
- NumericUpDown - to control width's value; set its Minimum and Maximum to the respective limits of the Width parameter in the camera (for the camera used while writing this note the values were 35 and 999985); set Increment to the respective value as well.
- ImpulseButton - to confirm new value.
- Connect NumericUpDown's outValue to the new SetParameter's inValue.
- Go back to MainLoop and connect the new ImpulseButton's outValue to the condition port of the variant macrofilter.
Now when the user clicks the confirm button the program will enter the variant macro, stop the acquisition, change the width and restart the acquisition. If the user changes the value by using NumericUpDown buttons the value will be properly aligned.
However, if the user enters a value by typing, it may not be guaranteed to work with the camera. It is possible to design a macrofilter which will make sure the value is accepted by the camera, but this is not the topic of this application note.
Additional remarks
Camera filters cannot be executed in array mode (for example when an array of camera addresses is connected).
Since a camera is an external hardware, they may be causing errors (like connection errors) unrelated to the Aurora Vision application. To properly handle those errors the application should feature error handling.