You are here: Start » Program Examples » Bottle Crate
Bottle Crate
Aim:
The task is to count bottles in a crate and check if all of them have caps.
Input:
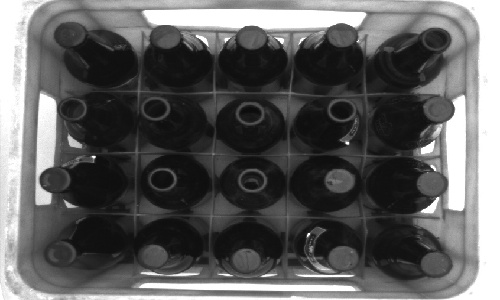
An image of a crate with bottles . The position of the crate is consistent.
Output:
Calculated number of bottles and caps.
Hints:
Location of the crate and the bottles is stable. To check the bottles'presence, the DetectMultipleCircles can be used. This method can be faster than performing Template Matching.
To check for the presence of the caps, the CheckPresence_PixelAmount can be used.
Labeling connections is explained in this article.
Solution (AVS):
-
In the Workspace Explorer, open the workspace Examples, and in the Filmstrip window, select the BottleCrate dataset. Drag the Image channel to the ACQUIRE section. Label the outImage output as Image.
-
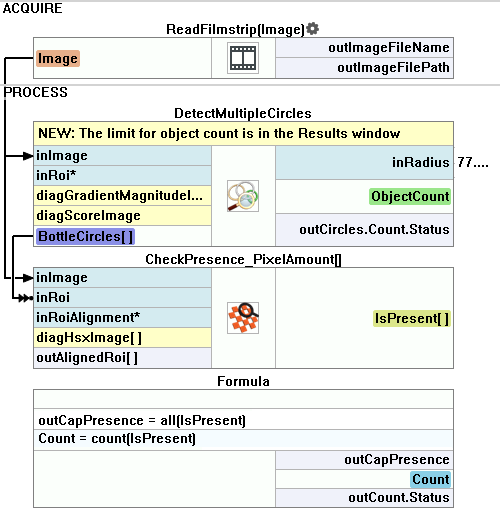
Add the the DetectMultipleCircles filter to the PROCESS section to find all the tops of the bottles.
- Connect its inImages input with the Image.
- Set the inRadius to 77.0.
- Set the inMaxOverlap to 0.0.
- Set the inMinScore to 28.0.
- Set the inEdgeThreshold to 4.
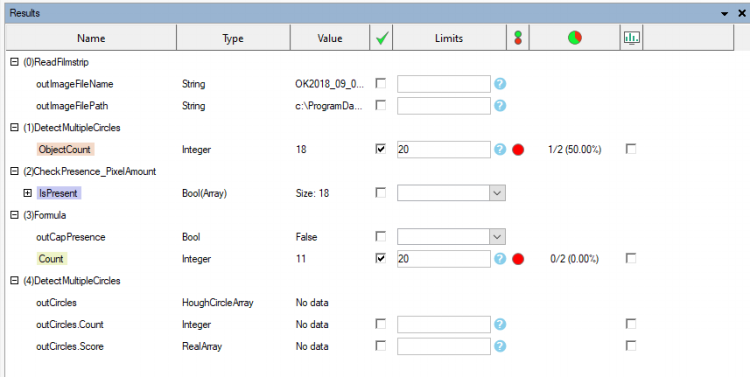
- Show the outCircles.Count port by clicking "Show/Hide Ports" on the filter. Label it as ObjectCount. Then, open the Results Control, mark the checkbox in the ObjectCount row, and set Limits to 20:
- Label the outCircles.Circle[] output as "BottleCircles".
-
For all the found bottles, check if the cap is present according to the color of the found circles. The cap has more bright pixels than the bottle's hole. Add the CheckPresence_PixelAmount and set the parameters as below:
- Connect its inImages input with the Image.
- Connect the inRegion with the "BottleCircles". Thanks to that each found bottle will be checked.
- Set the inMinSaturation to 86.
- Set the inMinBrightness to 49.
- Label the outIsPresent output as IsPresent.
-
To check if each found bottle has a cap, you can use the formula. You do not have to connect labeled outputs to the formula to be able to use them. Please note that without "out" before the name of the Formula's output, the output is automatically labeled.
outCapPresence = all(IsPresent)
Count = count(IsPresent) -
Open the Results Control, mark the checkbox in the Count row, and set Limits to 20
-
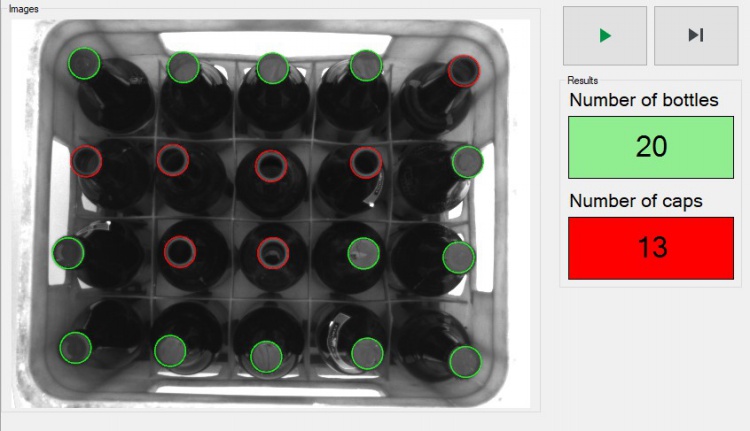
The program is finished. Now you can design your HMI:
- Create the HMI by clicking on the HMI button on the upper toolbar.
- Add the GroupBox container available in the Containers category of the HMI Controls, and set its Text property to Images*. It should cover most of the HMI area.
-
In the Images GroupBox:
- Add the view2DBox_PassFail indicator available in the Indicators category of the HMI Controls. It should fulfill the Images GroupBox. Connect its inImage port with the Image.
- Connect the inData1 port with the BottleCircles.
- Connect the inStatus1 with the IsPresent.
- Set the the view2DBox_PassFail parameters:
- LineWidth to 5.
- InitialSizeMode to FitToWindow.
-
Add the programControlBox available in the Controls category of the HMI Controls, and set it in the top right corner of the HMI. It shouldn't be inside the Images GroupBox.
-
Add another GroupBox and set its Text property to Results. Modify the size to let it contain four elements. In the Results GroupBox:
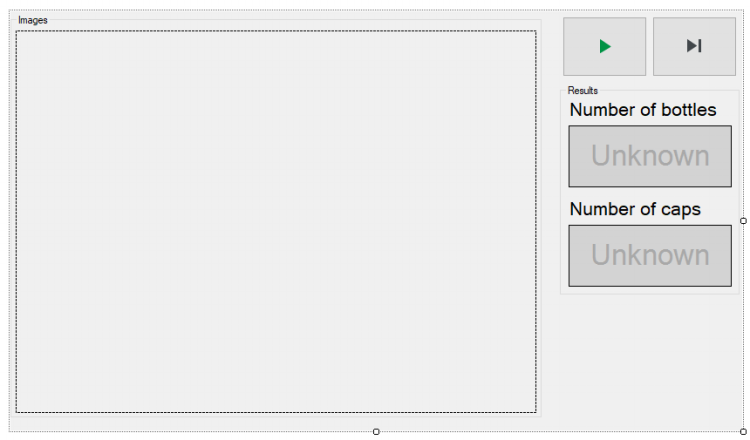
- Add two Label controls available in the Controls category of the HMI Controls and two PassFailIndicator indicators available in the Indicators category of the HMI Controls. Set the Text property of the first Label to Number of bottles. Set the Text property of the second Label to Number of caps. The HMI should look like the picture below:
- For the first PassFailIndicator connect the inFailText, the inPassText and the inNeutralText ports to the ObjectCount, and the InValue port to the outCircle.Count.Status.
- For the second PassFailIndicator connect the inFailText, the inPassText and the inNeutralText ports to the Count, and the InValue port to the outCount.Status.
- Add two Label controls available in the Controls category of the HMI Controls and two PassFailIndicator indicators available in the Indicators category of the HMI Controls. Set the Text property of the first Label to Number of bottles. Set the Text property of the second Label to Number of caps. The HMI should look like the picture below:
Macrofilter Main.