You are here: Start » User Interface » Deploying Programs with the Runtime Application
Deploying Programs with the Runtime Application
Introduction
Aurora Vision Executor is a lightweight application that can run programs created with Aurora Vision Studio. The GUI controls that appear in this application are the ones that have been created with the HMI Designer. The end user can manipulate the controls to adjust parameters and can see the results, but he is not able change the project.
Aurora Vision Executor application is installed with the Aurora Vision Studio Runtime package. It can be used on computers without the full development license. Only a runtime license is required. What is more, programs executed in Aurora Vision Executor usually run significantly faster, because there is no overhead of the advanced program control and visualization features of the graphical environment of Aurora Vision Studio.
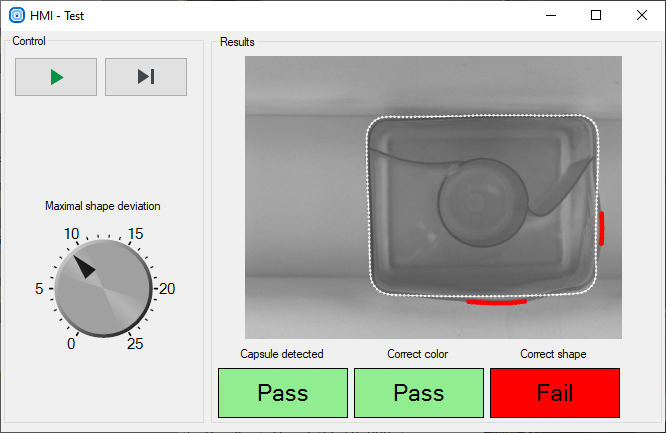
The screen of Aurora Vision Executor.
Usage
Open a project from a file and use standard buttons to control the program execution. A file can also be started using the Windows Explorer context menu command Run, which is default for computers with Aurora Vision Studio Runtime and no Aurora Vision Studio installed.
Please note, that Aurora Vision Executor can only run projects created in exactly the same version of Aurora Vision Studio. This limitation is introduced on purpose – little changes between versions of Studio may affect program compatibility. After any upgrade your application should first be loaded and re-saved with Aurora Vision Studio as it then runs some backward compatibility checks and adjustments that are not available in Executor.
Console mode
It is possible to run Aurora Vision Executor in the console mode. To do so, the --console argument is needed to be passed.
Note, that this mode makes the --program argument required so the application will know which program to run at startup.
Aurora Vision Executor is able to open a named pipe where it's log will be write into.
This is possible with --log-pipe argument which accepts a pipe name to be opened. One may then connect to the pipe and process Aurora Vision Executor log live.
This can be easily done e.g. in C#:
	var logPipe = new NamedPipeClientStream(".", "myProjectPipe", PipeDirection.In);
	logPipe.Connect();

	byte[] buffer = new byte[1024];
	int count = 0;
	while (logPipe.IsConnected && (count = logPipe.Read(buffer, 0, 1024)) > 0)
	{
		Console.WriteLine(Encoding.UTF8.GetString(buffer, 0, count));
	}
Available Aurora Vision Executor arguments are as follows:
- --program
- Path to the program to be loaded
- --log-level
- Sets the logged information level
- --console
- Runs the application in the console mode
- --auto-close
- Automatically closes the application when program is finished. Meaningful only in console mode.
- --language
- Specifies the language code to use as the user interface language.
- --attach
- Attaches application process to the calling process console.
- --log-pipe
- Creates a named pipe which will be populated with log entries during application lifetime. Meaningful only in console mode.
- --help
- Displays help
Runtime Executables
Aurora Vision Executor can open .avproj files, the same as Aurora Vision Studio, however it is better to use .avexe files here. Firstly one can have a single binary executable file for the runtime environment. Secondly this file is encrypted so that nobody is able to look at project details. To create one, open a project in Aurora Vision Studio and use File » Export to Runtime Executable.... This will produce an .avexe file that can be executed directly from the Windows Explorer.
If Aurora Vision project contains any User Filter libraries, it is crucial to put their *.dll files into the appropriate directory when running in Aurora Vision Executor. This is when exporting to .avexe file might also be a handy option. While defining the .avexe contents, it is possible to select all the User Filters libraries that the exported project depends on. Selected libraries are deployed then to the same directory as generated .avexe file and the .avexe itself is set to use all User Filter libraries from its directory.
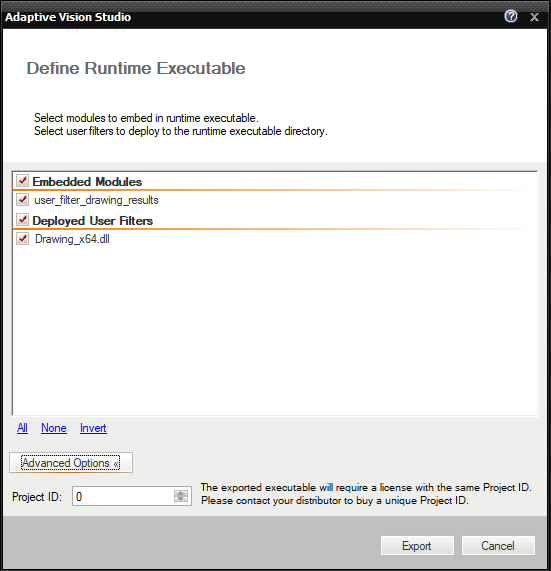
Defining the Runtime Executable.
In case there are any other dependencies, e.g. exposed by used User Filter libraries, one can add them into the Aurora Vision project as an attachment in Project Explorer and also deploy with .avexe file during export.
Project ID available in Advanced Options is an additional parameter that makes only a specific license able to run the application. At the customer request, Aurora Vision Team can generate the key (Project ID) and add it to the Runtime license. The same Project ID must be set for Runtime Executable export to connect the application with the specific license. If you leave this field default, any license will be able to run the .avexe file.
Trick: Configuration File as a Module Not Exported to AVEXE
It is often convenient to have an configuration file separated from the executable so that various parameters can be adjusted for a particular installation (but not made available to the end user). This can be easily implemented with a simple programming idiom:
- Use global parameters in your project for values that might require adjusting.
- Place the global parameters in a separate module (through the Project Explorer window).
- Exclude the module when exporting the .avexe file.
- In the runtime environment copy the .avexe file and the module (as a separate file) with global parameters.
- Open the config module in the Notepad to edit it when needed.
Other Runtime Options
Please note that Aurora Vision Executor is only one of several options for creating end-user's applications. Other available options are:
- .NET Macrofilter Interface Generator – generates a native .NET assembly (a DLL file) and makes it possible to invoke macrofilters created in Aurora Vision Studio as simple class methods from a .NET project. Internally the execution engine of Aurora Vision Studio is used, so modifying the related macrofilters does not require to re-compile the .NET solution. The HMI can be implemented with WinForms, WPF or similar technologies.
- C++ Code Generator – generates native C++ code (a CPP file) that is based on Aurora Vision Library C++. This code can be integrated with bigger C++ projects and the HMI can be implemented with Qt, MFC or similar libraries. Each time you modify the program in Studio, the C++ code has to be re-generated and re-compiled.
- Aurora Vision Console – allows to easily run created Studio applications (avproj/avexe files) on Windows or Linux based systems. Such programs can be controlled through created WebHMI panel.
Set Aurora Vision Executor as the "system shell"
On Windows systems it is possible to set Aurora Vision Executor as the "system shell", thus removing Desktop, Menu Start etc. completely. To do this go to Settings in Aurora Vision Executor and the Startup section. Mark the Set Aurora Vision Executor as the main system application (for the current user only). Please be informed that this option requires administrator privileges.
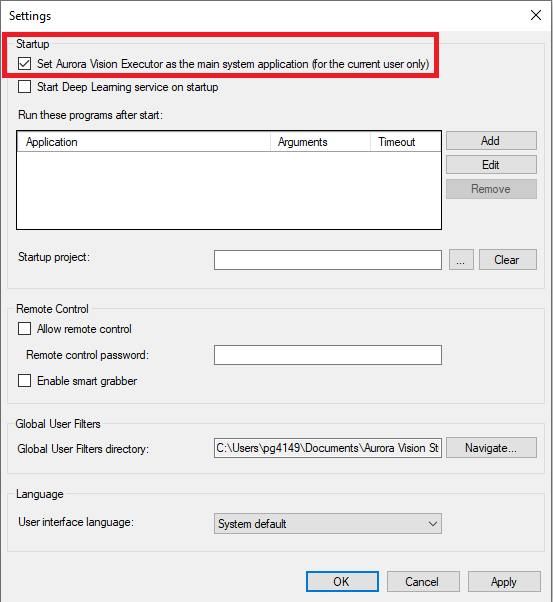
Set Aurora Vision Executor as the "system shell"
Startup Applications
It is possible to run any process before starting a program in Aurora Vision Executor. Go to Settings in Aurora Vision Executor and the Startup section. To define a new startup program select the Add button on the right. In a New startup program dialog box you need to specify the application path (obligatory) and arguments (optional). It is similar to typing the application name and command-line arguments in the Run dialog box of the Windows Start menu. The added program will appear in the list. All added programs will start each time you run Aurora Vision Executor.
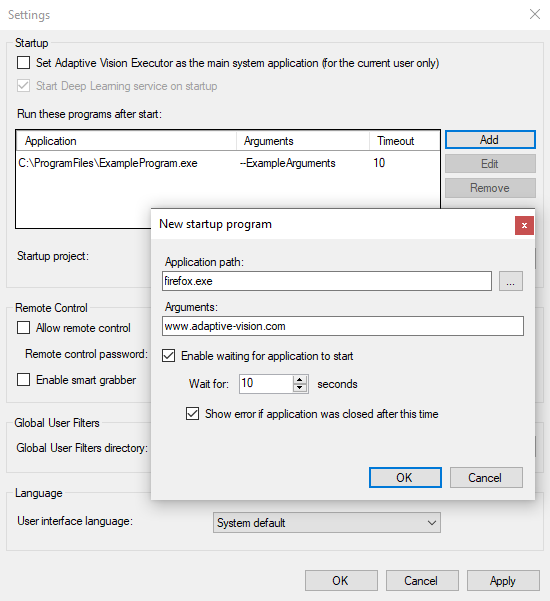
Defining Startup Applications
Startup Project
It is possible to choose the project the Aurora Vision Executor should run after the startup. Go to Settings in Aurora Vision Executor and the Startup section. To define the startup project select the ... button on the right. In an Open dialog box you need to specify the startup project path (obligatory). The added project's path will appear in the box. It will start each time you run Aurora Vision Executor.
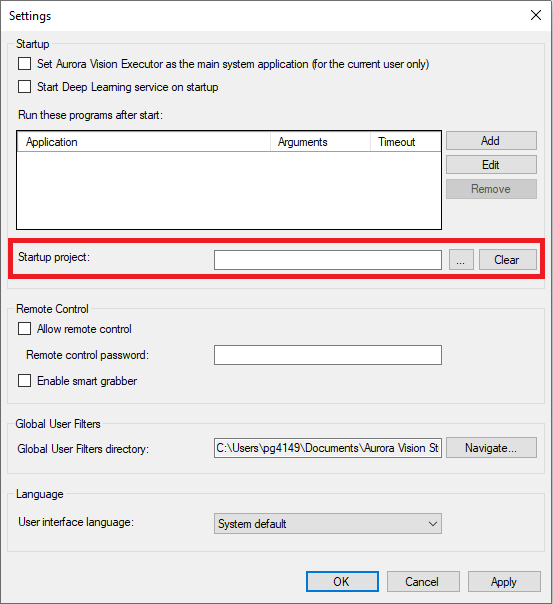
Defining Startup Project
If Deep Learning Service is installed you can choose to run it on start by selecting 'Start Deep Learning service on startup'.
| Previous: Seeing More in the Diagnostic Mode | Next: Remote Access to the Runtime Application |

