
You are here: Start » Extensibility » Creating User Filters
Creating User Filters
Note 1: Creating user filters requires C/C++ programming skills.
Note 2: With your own C/C++ code you can easily crash the entire application. We are not able to protect against that.
Introduction
User filters are written in C/C++ and allow the advanced users to extend capabilities of Adaptive Vision Studio with virtually no constraints. They can be used to support a new camera model, to communicate with external devices, to add application-specific image processing operations and more.
Prerequisites
To create a user filter you will need:
- an installed Microsoft Visual Studio 2010/2012/2013/2015/2017 for C++, Express Edition (free) or any higher edition,
- the environment variable
AVS_PROFESSIONAL_SDK4_10in your system (depending on the edition; a proper value of the variable is set during the installation of Adaptive Vision Studio), - C/C++ programming skills.
User filters are grouped in user filter libraries. Every user filter library is a single .dll file built using Microsoft Visual Studio. It can contain one or more filters that can be used in programs developed with Adaptive Vision Studio.
User Filter Libraries Location
There are two types of user filter libraries:
- Global – once created or imported to Adaptive Vision Studio they can be used in all projects. The filters from such libraries are visible in the Filter Catalog.
- Local – belong to specific projects of Adaptive Vision Studio. The filters from such libraries are visible only in the project that the library has been added to.
A solution (.sln file) of a global user filter library can be located in any location on your hard disk, but the default and recommended location
is Documents\Adaptive Vision Studio 4.10 Professional\Sources\UserFilters (the exact path can vary depending on the version of Adaptive Vision Studio). The output .dll file
built using Visual Studio and containing global user filters has to be located in Documents\Adaptive Vision Studio 4.10 Professional\Filters\x64
(this time the exact path depends on the version and the edition) and this path is set in the initial settings of the generated Visual Studio project.
For global user filter libraries, this path must not be changed because Adaptive Vision Studio monitors this directory for changes of the .dll files.
The Global User Filter .dll file for Adaptive Vision Executor has to be located in Documents\Adaptive Vision Studio 4.10 Runtime\Filters\x64
(again, the exact path depends on the version and edition). For 32 bit edition the last subdirectory should be changed from x64 to Win32.
The Local User Filter .dll file for Adaptive Vision Executor has to be located in path configured in the User Filter properties. You can modify this path by editing user filters library properties in Project Explorer.
A local user filter library is a part of the project developed with Adaptive Vision Studio and both source and output .dll files can be located anywhere on the hard drive. Use the Project Explorer task pane to check or modify paths to the output .dll and Visual Studio solution files of the user filter library. The changes of the output .dll file are monitored by Adaptive Vision Studio irrespectively of the file location. It's a good practice to keep the local user filter library sources (and the output .dll) relatively to the location of the developed project, for example in a subdirectory of the project.
Dependent DLL
User filter libraries are often created as wrappers of third party libraries, e.g. of APIs for some specific hardware. These libraries often come in the form of DLL files. For a user filter to work properly, the other DLL files must be located in an accessible disk location at runtime, or the user gets the error code 126, The specified module could not be found. MSDN documentation specifies possible options in the article Search Path Used by Windows to Locate a DLL. From the point of view of user filters in Adaptive Vision Studio, the most typical option is the one related to changing the PATH environment variable – almost all camera manufacturers follow this way. For local user filters it is also allowed to add dependent dll in the same directory as the user filter dll directory.
Adding New Global User Filter Libraries
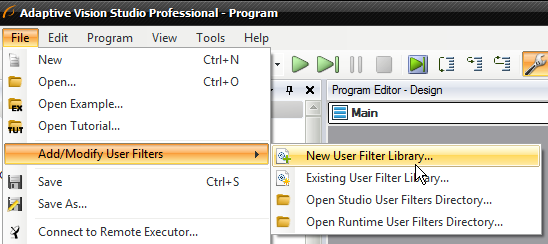
To add a new user filter library, start with File » Add/Modify User Filters » New User Filter Library....
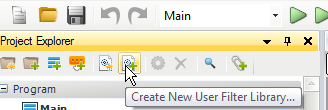
The other option is to use Create New User Filter Library button from Project Explorer pane.
A dialog box will appear where you should choose:
- name for the new library,
- type of the library: local (available in current project only) or global (available in all projects),
- location of the solution directory,
- version of Visual Studio (2010, 2012, 2013, 2015 or 2017),
- whether Visual Studio should be opened automatically,
- whether the code of example user filters should be added to the solution - good idea for users with less experience with user filters programming.
If you choose Visual Studio to be opened, you can build this solution instantly. A new library of filters will be created and after a few seconds loaded to Adaptive Vision Studio. Switch back to Adaptive Vision Studio to see the new filters in appropriate categories of Filters Catalog (global user filters) or Project Explorer (local user filters). You can work simultaneously in both Microsoft Visual Studio and Adaptive Vision Studio. Any time the C++ code is built, the filters will get reloaded. Just re-run your program in Adaptive Vision Studio to see what has changed.
Adding New Local User Filter Libraries
To add a new local user filter use the "Create New User Filter Library.." button in the Project Explorer pane. As on the image below:
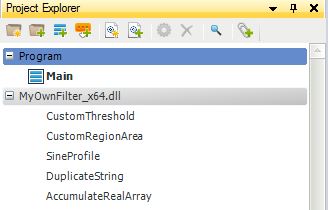
After compilation user filters will be accessible from the Project Explorer window.
Structure of User Filter Class
A user filter is a class derived from the UserFilter class defined in UserFilter.h header file. When creating a filter without state you have to override two methods:
- Define – defines the interface of the filter, including its name, category, inputs and outputs.
- Invoke – defines the routine that transforms inputs into outputs.
When creating a filter with state (storing information from previous invocations) the class is going to have some data fields and two additional methods have to be overridden:
- Init – initializes the state variables, invoked at the beginning of a Task parenting the instance of the filter, may be invoked multiple times during filter instance lifetime.
- Stop – deinitializes the state variables, including releasing of external and I/O resources (like file handles or network connections), may not affect data on filter outputs, invoked at the end of a Task parenting the filter instance (to pair every Init call).
When a user filter class is created it has to be registered. This is done in the RegisterUserObjects function which is defined at the bottom of the sample user filters' code. You do not need to call it manually, it's called by Adaptive Vision Studio while loading filters from the .dll file.
Structure of Define Method
Use the Define method to set the name, category, image (used as the icon of the filter) and tooltip for your filter. All of this can be set by using proper Set... methods.
The Define method should also contain a definition of the filter's external interface, which means: inputs, outputs and diagnostic outputs. The external interface should be defined using AddInput, AddOutput and AddDiagnosticOutput methods. These methods allow to define name, type and tooltip for every input/output of filter. For inputs a definition of the default value is also possible.
Adaptive Vision Studio uses a set of additional attributes for ports. To apply attribute on a port use AddAttribute method. Example:
AddAttribute(L"ArraySync", L"inA inB");
List of attributes:
| Attribute Name | Description | Example | Comment |
|---|---|---|---|
| ArraySync | Defines a set of synchronized ports. | L"inA inB" | Informs that arrays in inA and inB require the same number of elements. |
| UserLevel | Defines user level access to the filter. | L"Advanced" | Only users with Advanced level will find this filter in Filter Catalog. |
| UsageTips | Defines additional documentation text. | L"Use this filter for creating a line." | This is instruction where this filter is needed. |
| AllowedSingleton | Filter can accept singleton connections on input | L"inA" | User can connect a single value to inA which has Array type. |
| FilterGroup | Defines element of filter group. | L"FilterName<VariantName> default ## Description for group" | Creates a FilterName with default element VariantName. More detailed description in "Filters Groups" |
| Tags | Defines alternative names for this filter. | L"DrawText DrawString PutText" | When user types "DrawText" this filter will be in result list. |
Filters Groups
Several filters can be grouped into a single group, which can be very helpful for user to change variant of very similar operations.
To create filter group define attribute L"FilterGroup" for default filter with parameters. L"FilterName<VariantName> default ## Description for group". Notice "default" word. Text after "##" defines the tooltip for whole group.
If default filter is defined you can add another filter using L"FilterGroup" with parameter L"FilterName<NextVariant>"
Example usage:
// Default filter FindCircle -> Find: Circle
AddAttribute(L"FilterGroup", L"Find<Circle> default ## Finds an object on the image");
...

// Second variant FindRectangle -> Find: Rectangle
AddAttribute(L"FilterGroup", L"Find<Rectangle>");
...

// Third variant FindPolygon -> Find: Polygon
AddAttribute(L"FilterGroup", L"Find<Polygon>");
...
As result a filter group Find will be created with three variants: Circle, Rectangle, Polygon.
Using custom user filter icons
Using methods SetImage and SetImageBig user can assign a custom icon for user filter. Filter icon must be located in this same directory as output output
user filter DLL file.
There are four types of icons:
- Small Icon- icon with size 16x16 pixels used in Filters Catalog, set by
SetImage, name should end with "_16" - Medium Icon- icon of size 24x24 pixel, created automatically from Big Icon,
- Big Icon- icon of size 48x48 pixel, set by
SetImageBig, name should end with "_48", - Description Icon- icon of size 72x72 used in filter selection from group, name is created by replacing "_48" from
SetImageBigby "_D". For givenSetImageBigas "custom_48.png" a name "custom_D.png" will be generated.
Structure of Invoke Method
An Invoke method has to contain 3 elements:
- Reading data from inputs
To read the value passed to the filter input, use the ReadInput method. This is a template method supporting all Adaptive Vision Studio data types. ReadInput method returns the value (by reference) using its second parameter. - Computing output data from input data
It is the core part. Any computations can be done here. - Writing data to outputs
Similarly to reading, there is a method WriteOutput that should be used to set values returned from filter on filter outputs.
Data types that don't contain blobs (i.e. int, avl::Point2D, avl::Rectangle2D) can be simply returned by passing the local variable to the WriteOutput method. Output variables with blobs (i.e. avl::Image, avl::Region) should be declared at least in a class scope.For more complex data types that use not only memory on stack but also on heap (data types containing blobs), for performance reasons, the variable containing return value cannot be destroyed after exiting Invoke method. The best solution to fulfill this requirement is to use the field in user filter class.class MyOwnFilter : public UserFilter { // ... int Invoke() { int length; // ... computing length ... WriteOutput("outLength", length); } // ... }
	class MyOwnFilter : public UserFilter
	{
		private:
			avl::Image image;
		// ...

		int Invoke()
		{
			// ... computing image ...
			WriteOutput("outImage", image);
		}

		// ...
	}
Invoke has to return one of the four possible values:
- INVOKE_ERROR - when something went wrong and program cannot be continued.
- INVOKE_NORMAL - when everything is OK and the filter can be invoked again.
- INVOKE_LOOP - when everything is OK and the filter requests more iterations.
- INVOKE_END - when everything is OK and the filter requests to stop the current loop.
For example the filter ReadVideo returns INVOKE_LOOP whenever a new frame is successfully read and INVOKE_END when there is the end. INVOKE_NORMAL is returned by filters that do not have any influence on the current loop continuation or exiting (for example ThresholdImage).
Accessing Console from User Filter
It is possible to add messages to the console of Adaptive Vision Studio from within the Invoke method. Logging messages can be used for problems visualization, but also for debugging. To add the message, use one of the following functions:
bool LogInfo   (const atl::String& message);
bool LogWarning(const atl::String& message);
bool LogError  (const atl::String& message);
bool LogFatal  (const atl::String& message);
User Filter Project Configuration
User filter project files (.sln and .vcproj) are generated by Adaptive Vision Studio during adding new user filter library. The settings of user filter project are
gathered in .props file available in props subdirectory of the Adaptive Vision Studio SDK (environment variable AVS_PROFESSIONAL_SDK4_10), typically
C:\Program Files\Adaptive Vision\Adaptive Vision Studio 4.10 Professional\SDK\props. If you want to configure the existing project to be a valid user filter library,
please use the proper .props file (file with v100 suffix is dedicated for Visual Studio 2010, v110 for 2012, v120 for 2013, v140 for 2015 and v141 for 2017).
Using the Full Version of AVL
By default, user filters are based on Adaptive Vision Library Lite library, which is a free edition of Adaptive Vision Library Professional. It contains data types and basic functions from the 'full' edition of Adaptive Vision Library. Please refer to the documentation of Adaptive Vision Library Lite and Adaptive Vision Library Professional to learn more about their features and capabilities.
If you have bought a license for the 'full' Adaptive Vision Library, you can use it in user filters instead of the Lite edition. The following steps are required:
-
In compiler settings of the project, change additional include directory from
$(AVS_PROFESSIONAL_SDK4_10)\includeto$(AVL_PATH4_10)\include(Configuration Properties | C/C++ | General | Additional Include Directories). -
In linker settings of the project, add new additional library directory
$(AVL_PATH4_10)\lib\$(Platform)(Configuration Properties | Linker | General | Additional Library Directories). -
In linker settings of the project, replace
AVL_Lite.libadditional dependency withAVL.lib(Configuration Properties | Linker | Input | Additional Dependencies). -
In source code file, change including
AVL_Lite.htoAVL.h.
Diagnostic Mode Execution and Diagnostic Outputs
User filters can have diagnostic outputs. Diagnostic outputs can be helpful during developing programs in Adaptive Vision Studio. The main purpose of this feature is to allow the user to view diagnostic data on the Data Previews, but they can also participate in the data flow and can be connected to an input of any filter. This type of connection is called a diagnostic connection and makes the destination filter to be executed in the Diagnostic mode (filter will be invoked only in the Diagnostic mode of program execution).
When a program is executed in the Non-Diagnostic mode, values of the diagnostic outputs shouldn't be (for performance purposes) computed by any filter. In user filters, you should use the IsDiagnosticMode() method for conditional computation of the data generated by your filter for diagnostic outputs. If the method returns True, execution is in the Diagnostic mode and values of the diagnostic outputs should be computed, otherwise, the execution is in the Non-Diagnostic mode and your filter shouldn't compute such values.
Filter Work Cancellation
Adaptive Vision Studio allows to stop execution of each filter during the time consuming computations. To use this option function IsWorkCancelled() can be used. If function returns value True the long computation should be finished because user pressed the "Stop" button.
Building x64 User Filters in Visual Studio Express Edition
If you're using Microsoft Visual Studio Express Edition for building user filters and you're using 64-bit edition of Adaptive Vision Studio, you may experience a problem with building user filters. Express Editions of Visual Studio don't contain 64-bit tools so building 64-bit user filters is not possible. The error message that you receive in this case looks like: "Platform 'x64' referenced in the project file 'xyz' cannot be found. Please make sure you have it installed under %VCTargetsPath%\Platforms\x64".
To fix the problem, download and install the Windows Software Development Kit 7.1. On some machines, the installation of SDK may fail. In this case, uninstalling the Visual Studio 2010 Express and all its components in needed. Then, after successful installation of the SDK, Visual Studio can be installed again.
If the SDK is successfully installed, the Platform Toolset setting should be changed to Windows7.1SDK. To find this setting, in the Solution Explorer open properties of the project and then go to Configuration Properties » General pane. When the Platform Toolset has the wrong value, the following error will be displayed: "fatal error LNK1104: cannot open file 'kernel32.lib'".
More information can be found here and here.
Upgrading User Filters to Newer Versions of Adaptive Vision Studio
When upgrading project with User Filters to more recent version of Adaptive Vision you should manually edit the User Filter vcxproj file in your favorite text editor e.g. notepad. Make sure to close the solution file in Visual Studio before performing the modifications.
In this file you should change all occurrences of AVS_PROFESSIONAL_SDKxx (where is xx is your current version of Adaptive Vision) to AVS_PROFESSIONAL_SDK4_10, save your changes and rebuild the project.
After successful build you can use your User Filter library in the new version of Adaptive Vision.
During compilation you can receive some errors if you use in your code function which has changed its interface. In such case, please refer the documentation and release notes to find out how the function was changed in the current version.
Using Arrays
User filters can process not only single data objects, but also arrays of them. In Adaptive Vision Studio, arrays are represented by data types with suffix Array (i.e. IntegerArray, ImageArray, RegionArrayArray). Multiple Array suffixes are used for multidimensional arrays. In C++ code of user filters, atl::Array<T> container is used for storing objects in arrays:
atl::Array< int > integers;
atl::Array< avl::Image > images;
atl::Array< atl::Array< avl::Region > > regions2Dim;
For more information about types from atl and avl namespaces, please refer the documentation of Adaptive Vision Library.
Generic User Filters
Generic filters are filters that do not have a strictly defined type of the data they process. Generic filters have to be concretized with a data type before they can be used. There are many generic filters provided with Adaptive Vision Studio (i.e. ArraySize) and user filters can be generic as well.
To create a generic user filter, you need to define one or more ports of the user filters as generic. In the call of AddInput method the second parameter (data type) has to contain < T >. Example usage:
AddInput ("inArray", "<T>Array", "", "Input array");
AddInput ("inObject", "<T>", "", "Object of any type");
In the Invoke method of a user filter, the GetTypeParam function can be used to resolve the data type that the filter has been concretized with. Once the data type is known, the data can be properly processed using the if-else statement. Please see the example below.
atl::String type = GetTypeParam(); // Getting type of generic instantiation as string.
int arrayByteSize = -1;

if (type == "Integer")
{
    atl::Array< int > ints = GetInputArray< int >("inArray");
    arrayByteSize = ints.Size() * sizeof(int);
}
else if (type == "Image")
{
    atl::Array< avs::Image > images = GetInputArray< avs::Image >("inArray");
    arrayByteSize = 0;
    for (int i = 0; i <  images.Size(); ++i)
        arrayByteSize += images[i].pitch * images[i].height;
}
Creating User Types in User Filters
When creating a User Filter add to the project an AVTYPE file with a user types description. The file should contain type descriptions in a format the same like the one used for creating User Types in a program. See Creating User Types. Sample user type description file:
enum PartType
{
	Nut
	Bolt
	Screw
	Hook
	Fastener
}

struct Part
{
	String 	Name
	Real	Width
	Real	Height
	Real	Tolerance
}
In your C++ code declare structures/enums with the same field types, names and order. If you create an enum then you can start using this type in your project instantly. For structures you must provide ReadData and WriteData functions overrides for serialization and deserialization.
In these functions you should serialize/deserialize all fields of your structure in the same order you declared them in the type definition file.
To support structure Part from the previous example in your source code you should add:
Structure declaration:
struct Part
{
	atl::String 	Name;
	float			Width;
	float			Height;
	float			Tolerance;
};
Structure deserialization function:
void ReadData(atl::BinaryReader& reader, Part& outPart)
{
	ReadData(reader, outPart.Name);
	ReadData(reader, outPart.Width);
	ReadData(reader, outPart.Height);
	ReadData(reader, outPart.Tolerance);
}
Structure serialization function:
void WriteData(atl::BinaryWriter& writer, const Part& inValue)
{
	WriteData(writer, inValue.Name);
	WriteData(writer, inValue.Width);
	WriteData(writer, inValue.Height);
	WriteData(writer, inValue.Tolerance);
}
Enum declaration:
enum PartType
{
	Nut,
	Bolt,
	Screw,
	Hook,
	Fastener
};
It is not required for custom serialization / deserialization of enum types.
The file with user type definitions has to be registered. This is done in the RegisterUserObjects class constructor which is defined at the bottom of the user filter code. You need to add there a registration of your file as RegisterTypeDefinitionFile("fileName.avtype"). The file name is a path to your type definitions file. The path should be absolute or relative to the User Filter dll file.
You can use types defined in a User Filter library in this User Filters library as well as in all other modules of the project. If you want to use the same type in multiple User Filters libraries then you should declare these types in each User Filters library.
The following Example Program: "User Filter With User Defined Types" demonstrates usage of User Types in User Filters.
Example: Image Acquisition from IDS Cameras
One of the most common uses of user filters is for communication with hardware, which does not (fully) support the standard GenICam industrial interface. Adaptive Vision Studio comes with a ready example of such a user filter – for image acquisition from cameras manufactured by the IDS company. You can use this example as a reference when implementing support for your specific hardware.
The source code is located in the directory:
%PUBLIC%\Documents\Adaptive Vision Studio 4.10 Professional\Sources\UserFilters\IDS
Here is a list of the most important classes in the code:
- CameraManager – a singleton managing all connections with the IDS device drivers.
- IDSCamera – a manager of a single image acquisition stream. It will be shared by multiple filters connected to the same device.
- IDS_BaseClass – a common base class for all user filter classes.
- IDS_GrabImage, IDS_GrabImage_WithTimeout, IDS_StartAcquisition – the classes of individual user filters.
The CameraManager constructor checks if an appropriate camera vendor's dll file is present in the system. The user filter project loads the library with the option of Delay-Loaded DLL turned on to correctly handle the case when the file is missing.
Requirement: To use the user filters for IDS cameras you need to install IDS Software Suite, which can be downloaded from IDS web page.
After the project is built in the appropriate Win32/x64 configuration, you will get the (global) user filters loaded to Adaptive Vision Studio automatically. They will appear in the Filter Catalog, "User Filters" section.
Remarks
- If you get problems with PDB files being locked, kill the mspdbsrv.exe process using Windows Task Manager. It is a known issue in Visual Studio. You can also switch to use the Release configuration instead.
- User filters can be debugged. See Debugging User Filters.
- A user filter library (in .dll file) that has been built using SDK from one version of Adaptive Vision Studio is not always compatible with other versions. If you want to use the user filter library with a different version, it may be required to rebuild the library.
- If you use Adaptive Vision Library ('full' edition) in user filters, Adaptive Vision Library and Adaptive Vision Studio should be in the same version.
- A solution of a user filter library can be generated with example filters. If you're a beginner in writing your own filters, it's probably a good idea to study these examples.
| Previous: Creating Deep Learning Model | Next: Debugging User Filters |